Things I Wish I Knew When I Started Photography
Tips For Beginners To Improve Your Photos
Oh, the things I wish I knew – the only true way to improve your photos is practice, study, fail and practice more.
Here are nine things that I wish I would have learned sooner. I hope you learn them from me before you make all the same mistakes I did.
When I first started my photography journey I believed that I would be taking perfect photos every shot in no time. How hard could it be? (Insert apology to every professional photographer here)
Fancy new camera – check
ALL the optional extra accessories – check
Introductory course at camera shop – check
You don’t know what you don’t know
~ Unknown
What could possibly go wrong?
What happened next? I’m sure you can guess …
Complete failure – I’ll admit it.
Photos were either blurry, too dark or light, or all of the above!
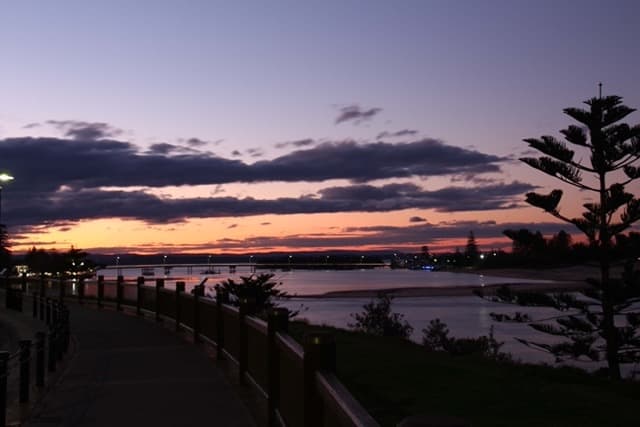
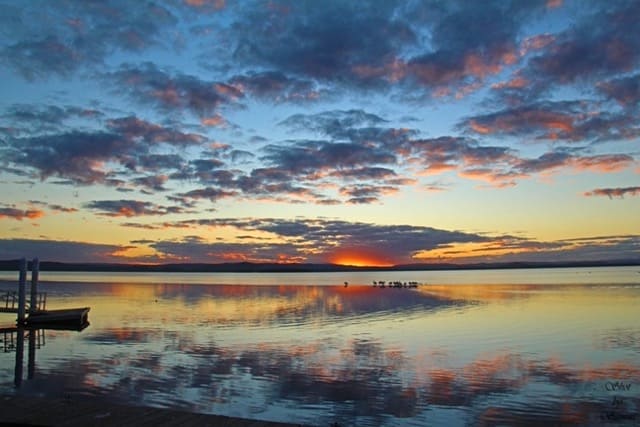
My First Sunset at The Entrance, NSW, Australia
Can you relate to this? Please tell me I’m not the only one.
The only true way to improve your photography is practice, study, fail and practice more. However, there are things that I wish I would have learned sooner.
So here are my nine things that I wish someone would have told me when I started photography. I hope they help you improve your photos even that little bit faster.

Learn the Basics as Soon as Possible
When I started, all I wanted was for someone to tell me the ‘magic’ settings to get perfect photos every time. Spoiler alert – that doesn’t exist.
I didn’t understand how important it was to understand the exposure triangle.
If you don’t know what the exposure triangle is, it is the relationship between shutter speed, ISO and aperture. These 3 elements all work together to create your exposure. This truly is the crux of every photo you take, and understanding this will improve your photos no end.

One thing I wanted to capture was waterfalls. I read that I needed a slow shutter speed for that silky smooth waterfall look. But I didn’t understand that the aperture and ISO also affected the exposure.
There is much more to it to understand fully, but I have created this basic guide to get you started and improve your photos –

For example, if you want the milky water effect, you need a slower shutter speed. This means the shutter is open longer allowing more light in. As such, you may need to reduce the aperture (a higher number) and/or lower your ISO. If you don’t adjust one or the other, too much light could cause your photo to be seriously overexposed.
As each of these elements interact with each other, understanding this basic concept is game changing. It will dramatically improve your photography and creativity, especially once you start shooting in manual mode.

Turn That Dial To Manual Mode and Shoot In RAW
I’m the first to admit, moving that dial to ‘M’ for Manual was incredibly daunting. But it really was the best way to learn how the camera worked.
Maybe start with a couple of practice sessions, and stick to auto on ‘proper’ outings until you feel more comfortable.
For your practice sessions, start with your ‘ideal’ or ‘suggested’ settings and have a look at your screen. Then try and figure out what you need to change to make it better.
This ‘playing’ is really the best way to learn, and you’ll be problem solving on the go. The more you do this the quicker you will learn and improve your photos. The old saying ‘practice makes perfect’ is more than fitting here!
Now for the file format…
Most cameras have the ability to shoot in both RAW format and JPEG.
Basically, a RAW file is unedited in any way by your camera. Conversely, if you shoot in JPEG, the camera processor is editing and compressing your image without any control from you.
Adobe Definitions
“RAW files contain uncompressed and unprocessed image data, allowing photographers to capture practically every detail they see in their viewfinder. The RAW file format stores the largest amount of detail out of any raster file type, which photographers can then edit, compress, and convert into other formats.
JPEG stands for Joint Photographic Experts Group, an international organisation that standardised the format during the late 1980s and early 1990s. It’s the go-to file format for digital images — and it has been ever since photographers began snapping and storing images on digital cameras and other reprographic devices.
A JPEG file supports up to 24-bit colour and uses lossy compression to compress images for more convenient storage and sending. This may make JPEGs better for everyday use, but it does mean sacrificing some of the original image quality.”
What does this really mean?
RAW files can look fairly flat when you first upload them on your computer, but they give you the freedom to edit them without destroying any of the data. This means you have a lot more freedom to edit and improve your photos without losing any image quality.
You may not want to edit right now, but just know if you make a mistake when taking your photo, it’s much easier to fix on a RAW file than a JPEG.
OR, shoot RAW plus JPEG. Most cameras will have that setting. Don’t worry if you don’t know anything about editing now. If you shoot and save your RAW files, they will be there later when and if you do.
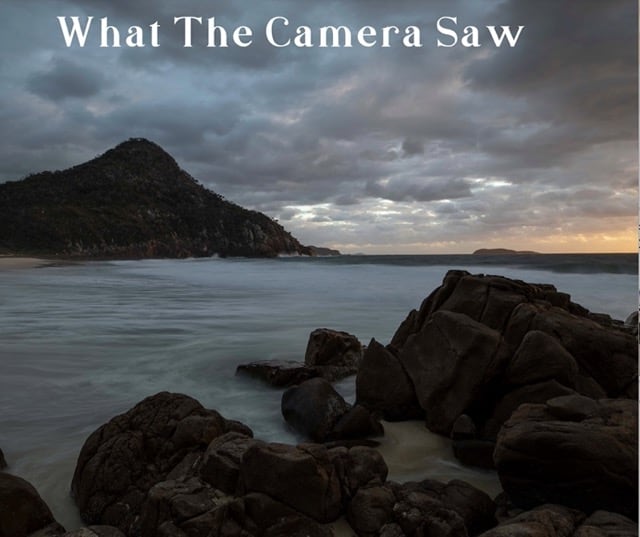
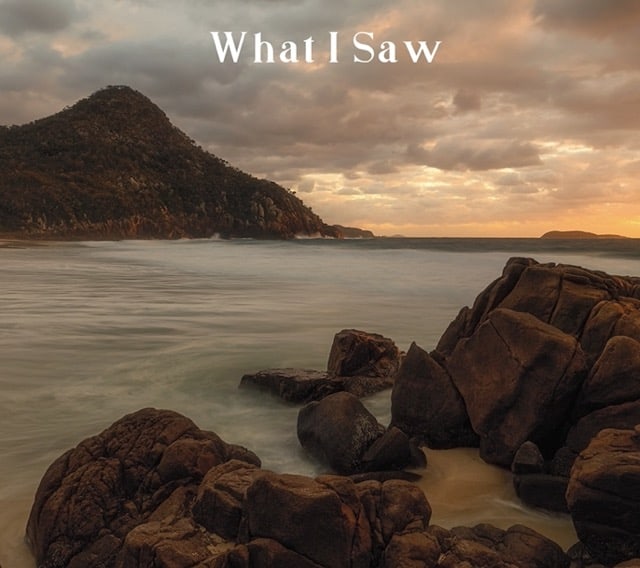
Not Every Sunrise Or Sunset Makes For Awesome Photos
When I first started I saw all these awesome sunrise and sunset photos all over social media. I’m sure you know what I’m talking about here.
You would think you should be rewarded for getting up at stupid o’clock right?
Wrong!!! So very, very wrong.
Yes, you can get lucky, but it’s the clouds and atmosphere that make for those stunning images. And they just don’t happen every day.

This is where following the weather apps comes in. They will guide you to the tides, rain, predicted cloud cover and fog. BUT, the big word here is ‘predicted’.
It’s definitely worth following and checking these apps. But the reality is, the more you get out there, the more likely you are to get those atmospheric shots.
So, check the apps, and unless the forecast is for torrential rain, set the alarm and go anyway.
If you don’t get out you’ve got a ZERO chance of an awesome sunrise.
There’s No Such Thing As Perfect Settings
While there are several useful guidelines for how to shoot in different scenarios, no two situations are going to be identical.
Conditions and the equipment you have will determine what settings you need to achieve the outcome you’re looking for.
This comes back to knowing the basics and being able to problem solve on the spot. Start with the ‘optimal’ settings and adjust as needed.
The most important thing is to get the photo, not the settings used. After all, you may be at a location or in a situation you’ll never see again. Do whatever it takes so you don’t end up with a blurry photo.
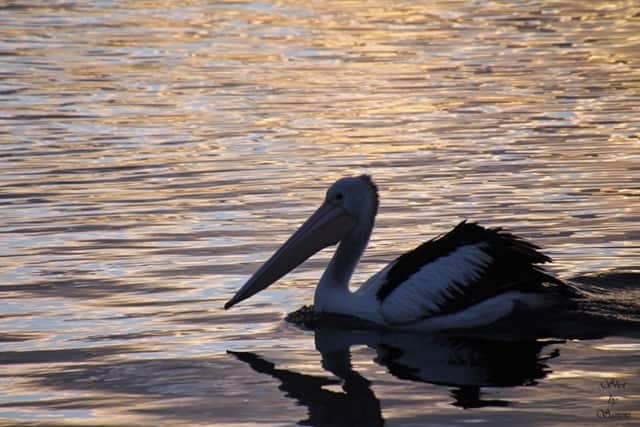
Very early in my photography days and no tripod. ISO was ridiculously high (12,800). I’ve been able to correct a little with software, but who knows if I will ever get back here again.
If shooting hand held you may need to increase your ISO to get a fast enough shutter speed to achieve the photo you want. In a perfect situation you have a tripod, be able to keep your ISO low and have a low shutter speed. BUT, you adjust, or you don’t get a sharp photo.
Of course, you always try to get the perfect settings, but just know that optimal settings are based on the conditions.
So just know that there are no perfect settings, just optimal settings to get the shot you want in your situation.
It’s Not All About The Gear
This is a big one! I really wish someone had told me that buying better gear wasn’t necessarily going to give me better images.
Yes, you do need a decent camera, tripod, bag and a few other essentials. But you don’t need the biggest and best of everything to improve your photos.
Whatever camera you have now is probably enough while you are learning. What really matters is learning to use what you have before upgrading.
Invest in Education Before You Invest in More Gear.
Seriously, if you ignore everything in this post, please take note of this.
GAS, or Gear Acquisition Syndrome is really just a way to spend your money. New gear won’t necessarily improve your photos. Yes, it can help, but not if you don’t know the basics of photography first.
If your goal is to improve your photography, the best investment is in education. Whether this is courses or tours, this money is going to be better spent than on gear.
Learn The Basics Of Composition – Composition Is Queen
Composition is Queen!
Ok, so the normal phrase is ‘Composition is King’, but you know …
There is so much to composition that it can’t be covered here – just try and understand the importance of this. It really can (and often is) the difference between a ‘good’ photo and an ‘amazing’ photo.
Keeping it simple is probably one of the best pieces of advice I was given in regards to composition.

Not everything needs to be in the one photo. By trying to capture it all, you can end up making a photo that is too busy. This means you are not showcasing any one subject, and can just create just a ‘mess’.
Think about the purpose of your photo – are you there to ‘document’ the entire scene, like in tourist brochures? Or are you there to create an interesting image? These are two very different goals.
For sure, take the grand vista ‘tourist’ shots, but don’t ONLY take those. Get creative and take your own image that is uniquely you.
If you’ve done any research on composition, you may have heard some of the following terms –
- Rule Of Thirds
- Golden Ratio
- Leading Lines
- Symmetry
- Foreground, Midground, Background
- Do Not Place Important Subject In The Middle
- Balance
- The List Goes On …
While all these guidelines have a place, please don’t consider them rules. Someone once referred to them as ‘Tools, not Rules’ and I really agree with that.
If you’d like to learn more about composition, I highly recommend Mads Peters Iversen. He is a fabulous photographer from Denmark who has lots of resources on Composition. Head here
and click on the LITE Version to grab his free starter guide. Then seriously consider buying his e-books – he really has a lot to teach.
The importance of composition really can’t be overstated if you’re looking to improve your photos. Maybe I should have put this at number one? Not really, as no point in having great composition if your photo is blurry!
Establish A Clear Workflow
Ensure you have a solid storage system for your photos and an efficient photography workflow.
I really wish I had learned this earlier so I didn’t have so much of a mess to clean up later.
Make your photography workflow easy and efficient. From download to publishing, follow this 7 step process for keeping your images safe, organised and easy to manage.
Your photos are all safely backed up, organised and ready to share whenever you choose.

Editing (or Post Processing) Is Essential
Before you scroll down past this section in horror, please humour me and read on.
I’m not talking about what you may think of as ‘Photoshopping’. What I’m referring to is using the available tools you have to improve your photos wherever possible.

Nothing says you can’t be creative though
I firmly believe in ‘getting in right in camera’ when you take the image. But by even shooting in RAW, it has to be edited just to be in a format that can be shared with others.
Yes, you always want to get the best exposure possible and an accurate representation of what you saw. But your camera will never do that – it simply ‘sees’ differently to our eyes, and therefore captures differently.
Every photo you’ve ever seen (including old film photos) have been edited in some way.
What I mean by editing is getting the best out of the data that you captured. And then reproducing what you saw the best you can.
I did naively think that I was going to create fabulous images straight out of camera, but this is just not the case.
Learning some basic editing opens up a whole new world of creative options.
You can just use it to enhance the RAW data so it represents what you saw. Or you can use it to develop a whole new style uniquely you.
That is the power of editing.
Learning some basic editing can give you options that simply taking a photo can’t. It doesn’t mean you need to spend hours editing a photo. It simply means you have the skills and choice if and when you need them.
What I Should Have Known
Sunrise Is Early. Yes I know this should be self-explanatory, but seriously, setting the alarm for 3am is really not something I ever considered. It’s usually dark, and can often also be cold and raining. The answer to this? COFFEE!!!
- Camera Gear Is Heavy – I’m fairly confident that my regular camera bag weighs over 10kg and that is without the tripod. As much as I try to economise, every time I leave something out I regret it big time. Then there’s trying to pack for carry on for airlines. You try packing a camera in your pocket so they don’t weigh it lol.
- You Have To Wear Ugly Shoes – Thanks to my dodgy feet and needing to walk on slippery rocks as safely as possible, REALLY ugly shoes …
- Did I Mention Exercise?

Conclusion
When I first started heading out with my camera I had no idea how important photography would become to me.
It really started out as a way to begin my second life and I slowly learned by making lots of mistakes.
Learning this way is totally fine, however I think I could have improved my photos quicker if I had known the above things earlier.
No matter what – have fun with your camera and never stop learning.
And remember, you will never take good photos if your camera is sitting at home, so get out there and get snapping! This is probably the number one step for you to improve your photos.
I truly hope you’ve enjoyed this post.
These are just a few of the things I wish I knew when I first went out with my camera. I hope you can learn these the easy way. Not the hard way like I have…
What is the one thing you wish you knew when you started out? Or maybe you are just starting out and one of these points have really resonated with you. Please let me know your thoughts.
That’s it for now – Keep clicking and stay caffeinated
Don’t miss a post – sign up Here to receive updates when I post a new article.
Note – This post does not contain any sponsored or affiliated links. All suggestions and opinions are mine. Unless otherwise stated, all photos are mine and remain my copyright images – Sam Wilson Photography.