Developing a Photography Workflow
A Basic Guide to Developing a Photography Workflow that is Simple and Effective
What is your photography workflow like?
Are you able to find any photo you’re looking for quickly?
Are your photos backed up regularly?
Do you know how to save your photos ready to share online or print?
If your answers are something like – ‘what’s a workflow?’, or ‘if my computer crashed I’d lose everything’ then I’m here to help.
I want to help you create a solid photography workflow that is easy to create and maintain.
Make your photography workflow easy and efficient. From download to publishing, follow this 7 step process for keeping your images safe, organised and easy to manage.
- Transferring Your Images From Camera To Computer
- Importing Images Into An Editing Program
- Organising And Sorting Your Images
- Processing Your Images
- Exporting From Your Editing Program
- Backing Up Your Images
- Printing or Publishing Your Images Online
So, you’ve just got home from a shoot and removed that memory card from your camera – what next?
What Is A Photography Workflow?
A Photography workflow is a system of working with your images, from capture to publishing.
It is a series of steps to simplify and speed up the process of working with your images. But it really is much more than that. It is developing a system so your photos are organised, backed up safely and ready to share at any time.
Let’s get organised!

Transferring Your Images From Camera To Computer
Welcome to step one of your photography workflow.
There are several ways to transfer your images from your camera to your computer. You can connect your camera via a cable or use a card reader. My preferred way is to remove the card and use a card reader.
From here I download the images into a new folder on a portable hard drive ready to import into Lightroom. There are other programs to do this with but Lightroom is what I use.
Importing Images Into An Editing Program
Once your images are copied from your card, it’s time to import them into Lightroom.
Lightroom has many options to customise this. You can apply presets, add keywords and other tools to further organise your images. I highly recommend Matt Kloskowski’s courses on setting up a system if you would like to go to that length of detail.
I simply have a folder for each year, then separate folders in this for each shoot of that year.
From there I import it into my Lightroom catalog which lives on the same portable hard drive as my images.
Organising And Sorting Your Images
Step 3 of your photography workflow is to finally look at your images and do some sorting.
Now your photos are imported and saved safely, it’s now time to review your images. Identify the ones that are blurry or out of focus and get rid of them. As you do that, flag the images that are definite keepers – the ones you are keen to edit first.
The system I use to rate them is numbering them in Lightroom. 5 stars for the best, and 3 that I think may have potential.
TIP – don’t delete any that aren’t totally ‘rubbish’, as you can be pleasantly surprised when looking at them later on. I’ve gone back through older images, and with improved editing knowledge have been surprised with what I can create.
Processing Your Images
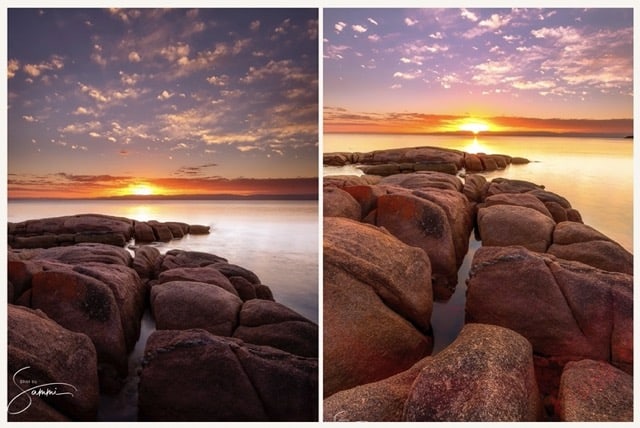
To make the most of your images, some processing or editing is an essential part of your photography workflow.
There is no correct or one way to edit a photo. Editing is an art form on its own and it’s completely up to each individual.
It’s a great opportunity to get creative and really get creative.
You may simply crop your photos to bring attention to your subject or straighten your image so the horizon is level. Or you may get really in depth and adjust colours, delete distractions – the sky really is the limit. And that’s without going for the old sky-replacement!
Just enjoy and have fun.
If you’re looking for some good basic editing tutorials, I thoroughly recommend both Anthony Morganti and Matt Kloskowski. Both offer free videos on YouTube and Matt also sells excellent courses.
Exporting From Your Editing Program
Once you’ve finished editing your images, the next step in your photography workflow is to export the files so they are ready for publishing or printing.
The process will vary depending on the program you use. I recommend exporting one as a JPEG for online, as well as a TIFF for printing. Also, if possible save your working file so you can go back and edit later if needed.
Social Media Tips – These are the export settings I use to share on Facebook and Social Media. Save for Web (this is a Photoshop Setting), format JPEG, quality 100, longest edge 2048 pixels, convert to sRGB.
Backing Up Your Images
Now that you’ve done all that work, you want to keep those photos safe!
You really never know when a computer will crash or something may corrupt some or all of your files. I would hate for you to lose all of your beautiful images. This is why your photography workflow must include backup.
Ideally you should back up your images to at least two locations on top of where you have them saved. I recommend backing them up to at least two external hard drives and a cloud system.
This may seem like overkill, but these options are really cost effective compared to losing them forever.
It really is a small price to pay to ensure your images are safe.

Printing or Publishing Your Images Online
Your photos are now nicely edited, backed up safely and exported where you can find them easily. It’s time for the final step in your photography workflow – sharing them with others!
If you’ve exported as outlined above your photos are now ready to be shared on social media.
Printing is another story …
If you’ve ever printed photos from your computer, it’s quite likely you’ve been disappointed with your results. It’s quite common that your printed images look darker than they did on screen.
This is usually because your monitor is too bright and it’s also backlit unlike the medium you would print on.
There are a number of other points to consider when printing. I would suggest going to a professional printer as you want your prints to look as good as possible.
Alternatively consider undertaking some print specific courses and investing in a monitor calibrator.
Photography Workflow Wrap Up
Congratulations – you now have a simple process for keeping your images safe, organised and easy to manage.
Now that you’ve completed your photography workflow you can relax. Your photos are all safely backed up, organised and ready to share whenever you choose.
You can now focus on what’s most important – getting back out there and taking more photos!!!
I truly hope you’ve enjoyed this post and you are encouraged to share your photos online. Better yet, I really hope you have them proudly printed and displayed in your home. They can also make great gifts for family and friends.
As promised, here’s your link to your free photography resources bundle including the one page Photography Workflow:

I’d love it if you have any of your own workflow tips. Let me know in the comments below.
That’s it for now – Keep clicking and stay caffeinated
Don’t miss a post – sign up Here if you haven’t already
Note – This post does not contain any sponsored or affiliated links. All suggestions and opinions are mine. Unless otherwise stated, all photos are mine and remain my copyright images – Sam Wilson Photography.
16 Comments