Best Camera Modes for New Photographers: It Isn’t Always Manual
This article has everything you need to know about the best camera modes for new photographers.
Have you been told that serious, or professional photographers only shoot in manual? This can put a lot of new photographers into anxiety mode, and it’s not really necessary.
Cameras have different modes for a reason and there’s nothing to be ashamed about by using any of them, automatic included. You can learn a lot by using automatic when you’re just starting out.
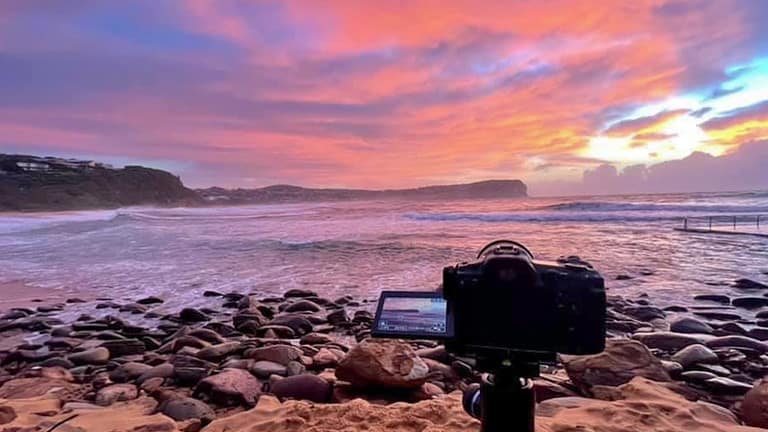
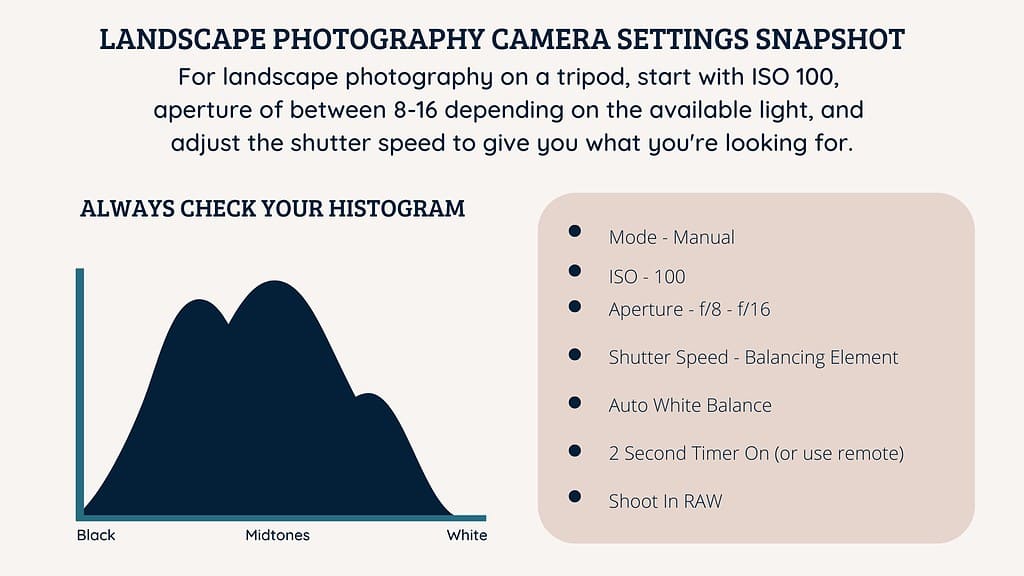
As most of my photography is landscapes and seascapes using a tripod, I do usually use manual mode.
But it’s not the only thing I use.
When doing daytime ‘travel photography’ for example, I will often use aperture priority, and when I’m out trying to photograph whales or animals, I will usually use shutter priority.
So, let’s look at each of these and when best to use each mode.
From automatic to fully manual, you’ll learn when to use each mode to its advantage so you can take the best photos in any given situation.
Camera Modes: A Quick Snapshot
Automatic Mode: The camera makes all exposure decisions for you.
Program Mode: The camera selects both aperture and shutter speed, while you control other settings.
Aperture Priority Mode: You set the aperture, and the camera determines the appropriate shutter speed.
Shutter Priority Mode: You choose the shutter speed, and the camera adjusts the aperture for proper exposure.
It’s about using the right tool for the job, whether you’re snapping a quick picture or setting up a detailed shot. It is not about there only being one right way!
In this guide, we’ll delve deep into these modes. We’ll explore how ‘Automatic’ can provide quick and effective results for spontaneous shots, while modes like ‘Aperture Priority’ or ‘Shutter Priority’ grant more creative control.
We’ll also address the intricacies of ‘Manual’ mode, and how it allows you to have complete command over your settings.
With each mode, we’ll highlight its strengths, ideal uses, and potential limitations.
The aim? To equip you with the knowledge to seamlessly switch between modes, ensuring every photograph, be it a tranquil landscape or a vibrant street scene, is captured to its fullest potential.
With that foundation laid, let’s dive into the specifics of each mode and discover how they can elevate your photography journey.
Let’s dive into this article all about each of these camera modes for new photographer

Automatic Mode (Auto): A Great Starting Point
The ‘Automatic’ mode is like your camera’s default setting, doing the heavy lifting for you to get a decent shot.
Why It’s Great for Beginners
In ‘Auto’ mode, your camera takes the reins, deciding on settings like shutter speed, aperture, and ISO.
This is perfect when you’re starting out or when you want to snap a quick photo without diving into manual settings.
It’s also great when you arrive at a scene that you just don’t know where to start with your settings.
Here you can take a shot in auto, and look at the results on your viewfinder. If you’re happy with the shot then great.
But if not, you can look at the settings the camera used for the shot and work out what you might need to change to get the image you’re looking for. You can then change modes and adjust as you wish.
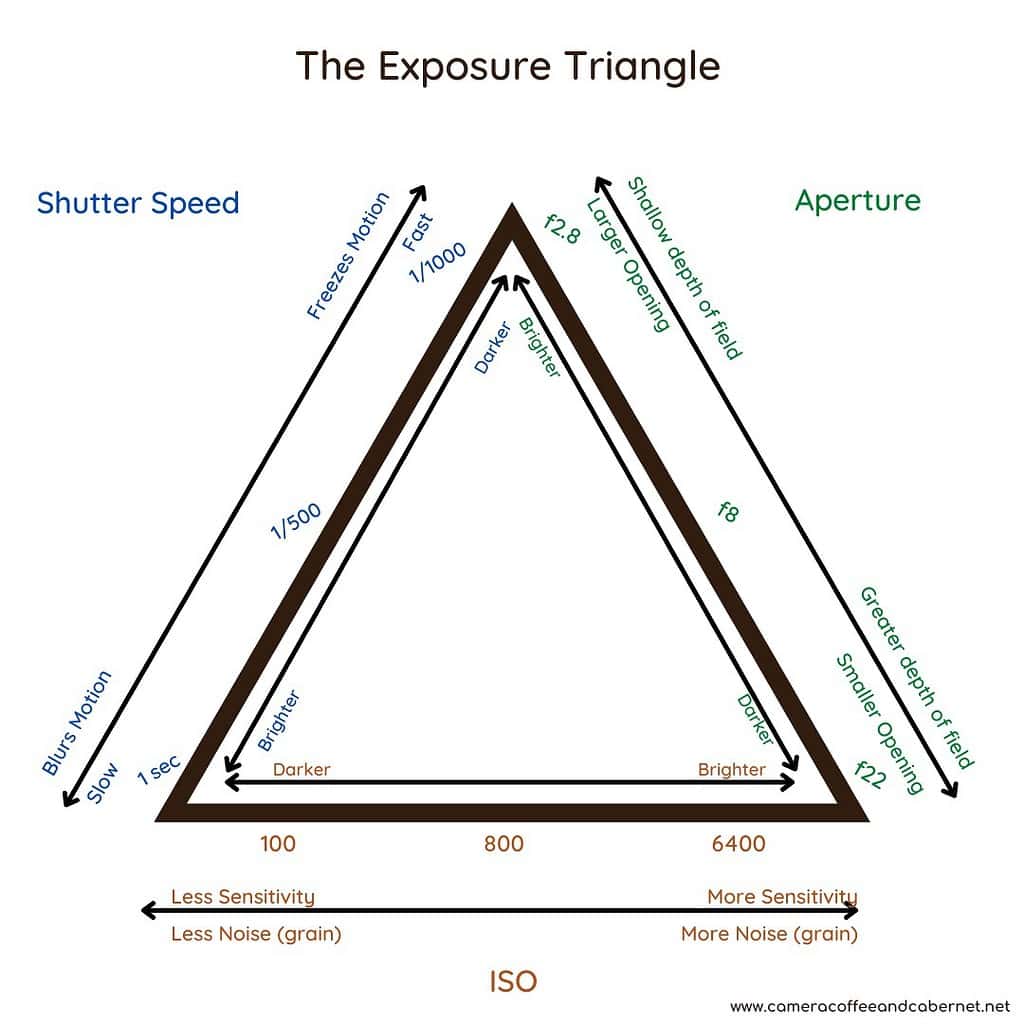
You will need to understand the basics of exposure and the exposure triangle so you understand which settings to change though.
The Catch: It’s Not Always Perfect
But ‘Auto’ has its limits. The camera doesn’t always get it right.
It can be a reliable choice in well, evenly lit environments.
If you’re out on a bright day, capturing city scenes or open landscapes, this mode often gets things right.
In challenging light or when you want a specific effect – like capturing the motion of flowing water – it might not deliver exactly what you’re aiming for.
Pros and Cons of Automatic Mode
Pros: Straightforward, ideal for general lighting, minimises fuss.
Cons: Can fall short in unique lighting situations or when specific creative effects are desired.
Program Mode (P): Balancing Ease and Control
Program Mode, often denoted as ‘P’ on cameras, is a step up from ‘Auto’.
A Bit More Control Than Auto
While the camera still manages the shutter speed and aperture for you, Program allows you to override certain settings including ISO and white balance.
It’s like having training wheels – you get a feel of control without diving into full manual mode.
Some Limitations to Consider
While Program can be a versatile camera mode for new photographers, it’s definitely not a one-size-fits-all.
In situations demanding detailed adjustments, like when you want to blur a moving subject while keeping everything else sharp, you might need a mode offering more control.
Pros and Cons of Program Mode
Pros: More flexibility than ‘Auto’, great for mixed lighting conditions, user-friendly for those progressing from automatic settings.
Cons: Still limited when it comes to specific creative choices, might not offer the exact control experienced photographers seek.
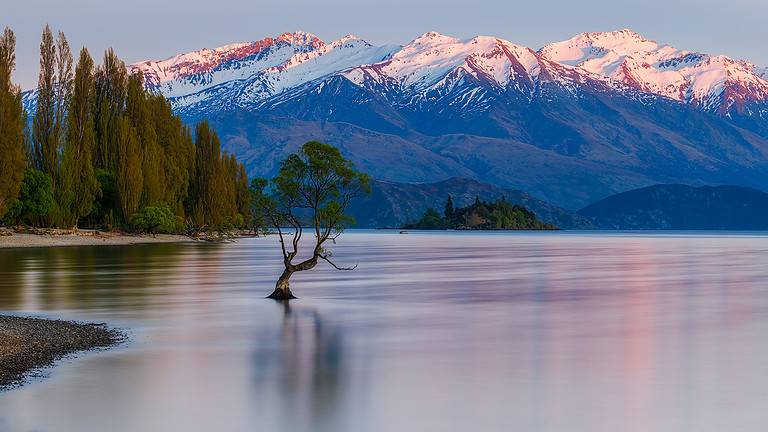
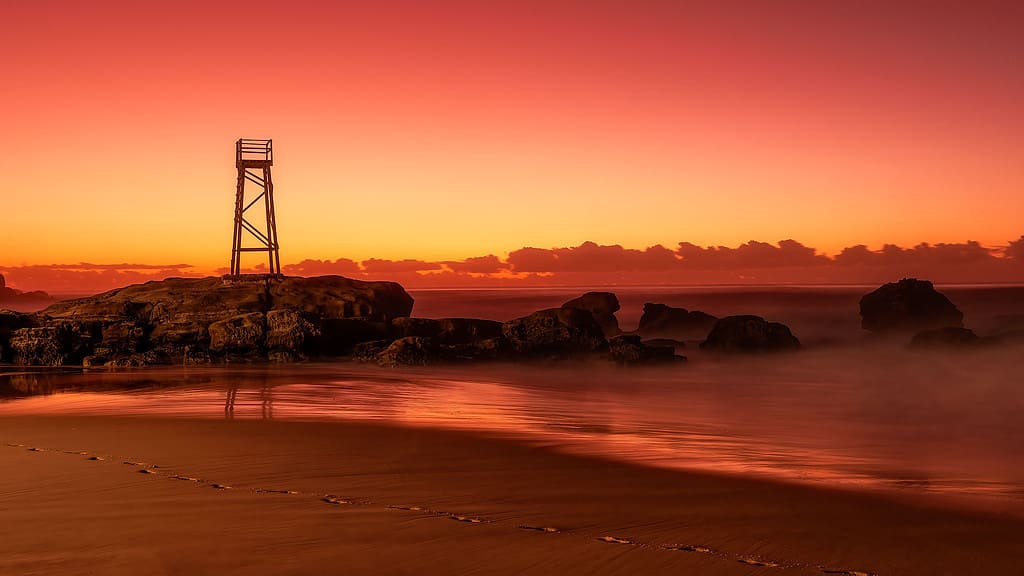
Aperture Priority Mode (A or Av): The Go-To for Depth and Detail
Aperture Priority Mode, usually denoted as ‘A’ or ‘Av’ on cameras, is all about giving photographers control over the depth of field.
For many landscape photographers, from beginners to professionals, this mode is a trusted ally.
Understanding Aperture and Depth
Controlling aperture means adjusting the lens opening.
A wider aperture (like f/1.8) results in a shallow depth of field, beautifully blurring the background to spotlight a subject.
Conversely, a narrower aperture (like f/16) ensures a vast depth of field, rendering both foreground and distant details in sharp focus.
This flexibility in manipulating focus is a powerful tool in a photographer’s arsenal.
The Digital Photography School has a great in-depth article on understanding depth of field that you may be interested in: Depth of Field: The Essential Guide.
Why Landscape Photographers Love It
Aperture priority mode shines in landscape scenarios:
- Vast Landscapes: When capturing expansive scenes, like the endless ocean or mountain ranges, a narrower aperture ensures edge-to-edge sharpness, letting viewers wander through the photo’s details.
- Isolating Subjects: For highlighting specific elements, like a lone tree or a rock formation, a wider aperture blurs the surroundings, making the subject pop.
Dynamic Lighting: In quickly changing light like during the golden hour this mode allows you to maintain your desired depth of field while the camera adjusts the shutter speed to accommodate changing conditions.
A Few Points to Remember
Although aperture priority mode automates shutter speed based on the chosen aperture, it’s essential to keep an eye on the resulting speeds.
Slow shutter speeds might require a tripod to avoid blur, especially in low light.
Pros and Cons of Aperture Priority Mode
Pros: Excellent control over depth of field, adaptable to changing light, preferred by many professionals for its balance of control and convenience.
Cons: Reliance on the camera for shutter speed might not always yield the desired motion effects, especially in challenging light or with fast-moving subjects.
Trusted Technique: Harnessing Exposure Compensation
Even with the best modes, sometimes the camera’s auto-exposure might not align with your vision. This is where exposure compensation becomes invaluable, especially when shooting in modes like Aperture Priority and Shutter Priority.
Exposure compensation allows you to instruct the camera to adjust its metered exposure. If a scene feels too dark or too bright, you can nudge the exposure up or down to match what you feel captures the scene best. It’s like fine-tuning, ensuring your shots are exposed just the way you want.
For a deep dive into mastering this technique, especially in landscape photography, check out my article: Exposure Compensation: How To Use It For Better Landscape Photos.
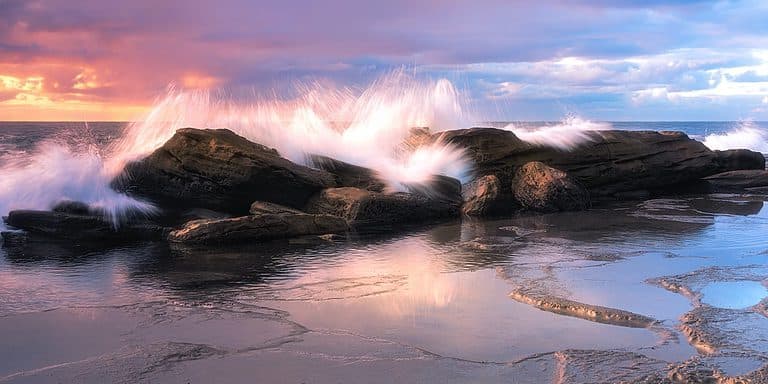
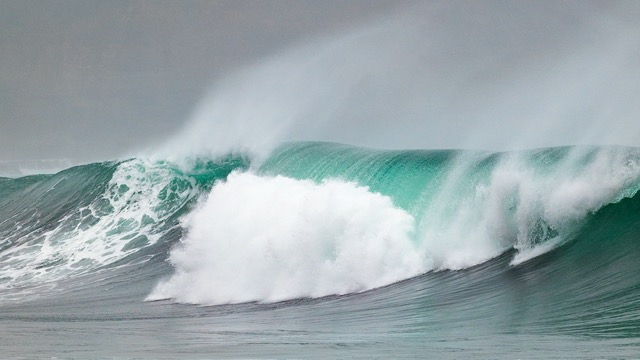
Shutter Priority Mode (S or Tv): Capturing Motion in Landscapes
Shutter Priority Mode, labelled as ‘S’ or ‘Tv’ on most cameras, puts you in control of the shutter speed while the camera adjusts the aperture accordingly.
This mode is particularly valuable when you aim to capture or control motion in your shots.
The Importance of Shutter Speed
Shutter speed determines how long the camera’s sensor is exposed to light.
Fast shutter speeds (like 1/1000s) freeze fast-moving subjects, while slow speeds (like 1s) can create a silky effect for flowing water or streaking clouds.
In essence, it’s all about how you want to depict motion in your frame.
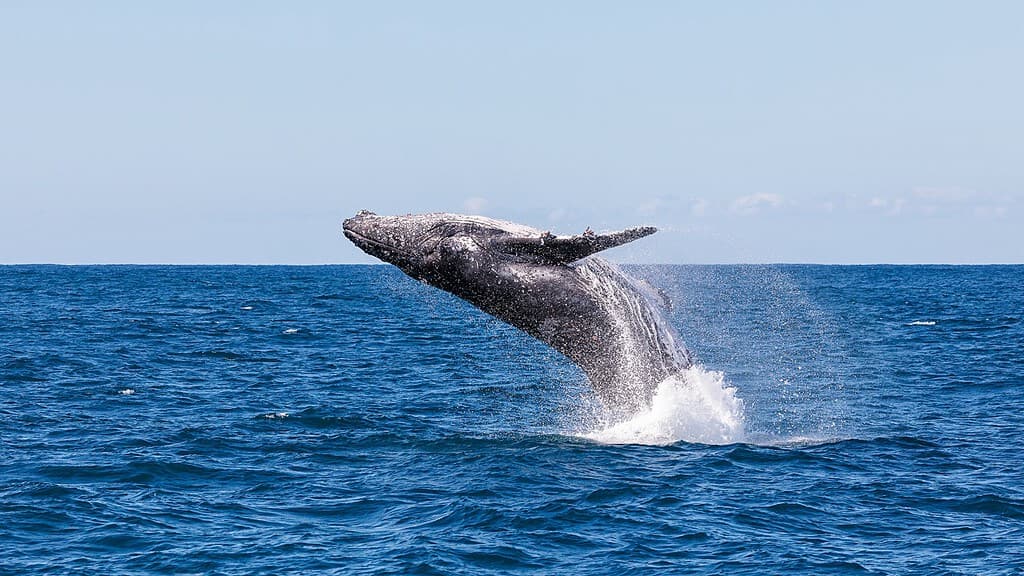
The Role of Shutter Priority Mode in Landscape Photography
For landscape photographers, ‘Shutter Priority’ mode offers a realm of creative possibilities:
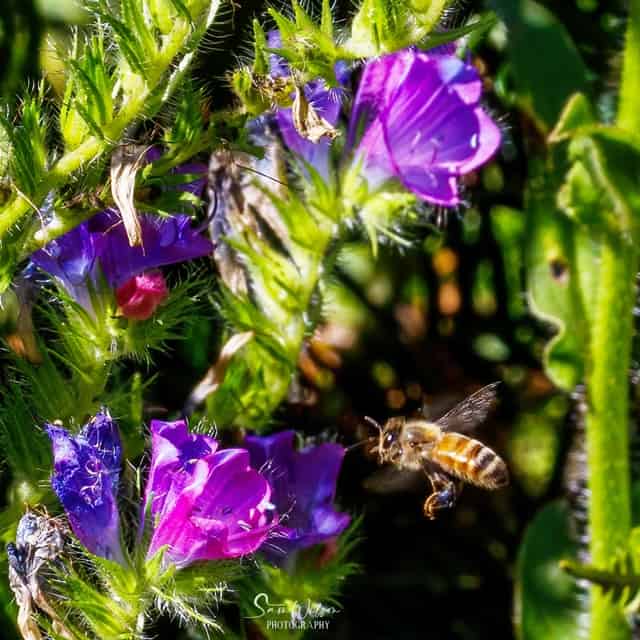
Freezing Fast Movements: Imagine capturing birds in mid-flight or leaves rustling in the wind. A fast shutter speed ensures your subject is sharp.
Flowing Effects: For scenes like waterfalls, rivers, or moving clouds, slower shutter speeds capture the sense of movement, lending a dreamy quality to the image.
Some Things to Consider
While Shutter Priority offers great flexibility, there’s one caveat: ensuring the chosen speed doesn’t lead to underexposure or overexposure.
Monitoring the resulting aperture and possibly using exposure compensation can help maintain the desired exposure.
Pros and Cons of Shutter Priority Mode
Pros: Excellent for controlling motion effects, versatile for varied movement scenarios in landscape shots, allows creative freedom in depicting motion.
Cons: Depending on the lighting, might require frequent ISO adjustments, risk of unintended blur with very slow speeds without stabilisation.
A note on Auto ISO
Most cameras will allow you to set Auto ISO in most camera modes (except for auto) and is often overlooked.
I’m a big fan of setting auto on as many settings as I can without compromising my end results and Auto ISO is a great tool to have in your kit.
You do have to be careful with this as the camera can get it very wrong if you give it full reign.
Fortunately you can set a range of values in your menus so when you’re out shooting your camera will pick the lowest possible ISO for correct exposure without going too high.
Be sure to learn this in your menu system and set your values.
Manual Mode (M): Complete Creative Control
Manual Mode, marked as ‘M’ on cameras, represents the zenith of control for photographers.
You have complete control over shutter speed and aperture, along with every other setting, which gives you an unmatched amount of creative freedom.
It’s akin to painting on a blank canvas, where you decide on every single detail.
When Manual Mode Shines in Landscape Photography
The beauty of ‘Manual’ mode becomes apparent in landscape photography:
- Complex Lighting: For scenarios with stark contrasts, like a blazing sunset over a serene ocean or landscapes dotted with shadows and bright spots, ‘Manual’ allows you to make micro-adjustments for that perfect capture.
- Creative Effects: Be it getting that starburst sun effect, tracing light trails in nocturnal city shots, or playing with long exposures for surreal outcomes, ‘Manual’ is your best mate.
- Precise Depth Control: While Aperture Priority offers depth of field adjustments, manual mode couples this with exact shutter speeds, ensuring both motion and depth match your vision.
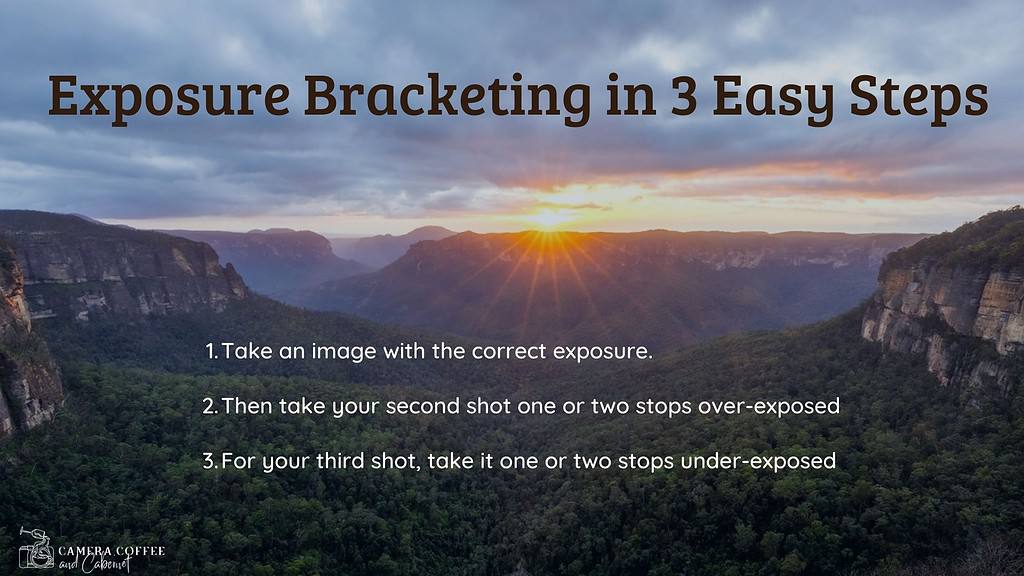
- Exposure Bracketing: Especially useful in tricky lighting, exposure bracketing lets you take multiple shots at different exposures, ensuring you don’t miss that perfect light. Learn more about this technique in “Exposure Bracketing: When and How To Use It For Better Landscape Photos“.
Focus Stacking: achieving precise focus across a wide landscape can be challenging if you want every small detail to be sharp. With manual mode you can overcome this with focus stacking. Capture a series of images with different focal points and blend them in post-processing for a final image with impeccable depth of field.
I tend to keep things as simple as possible so haven’t’ ventured too much into the world of focus stacking, but it is something that photographer Mark Denney does well:
Tips for Transitioning to Manual
Transitioning to manual definitely can be daunting when you’re just starting out, but here are some steps to simplify the process:
Start with Base Settings: When you’re first exploring manual mode, it’s handy to have some ‘cheat sheets’ or base settings for different scenarios.
These provide a solid starting point for your initial shots.
Change Just One Setting: Once you’re set with your base, try adjusting either the shutter speed or aperture. As you get the hang of it, you can begin playing around with both settings.
Practice Makes Perfect: As with all skills, acing manual mode is a matter of practice. Experiment, assess your outcomes, and adjust as you go.
Remember, while ‘Manual’ offers the most control, it’s a learning journey. If you’re just starting out, it’s perfectly okay to make mistakes or revert to other modes when needed. All photographers, even the pros, switch modes based on the situation. Embrace the learning curve and enjoy the process.
Pros and Cons of Manual Mode
Pros: Unrivalled control over both motion and depth, perfect for intricate lighting and specific creative outputs, the ultimate choice for precision in every frame.
Cons: Demands a solid grasp of camera settings, might seem overwhelming initially, often requires more time for tweaks compared to automated modes.
Creative Modes: A Brief Overview
Most cameras offer a medley of creative modes, each designed to cater to specific scenarios.
Even though the range and specifics can vary across brands, a few modes seem to be commonly present in most. Let’s shine a light on some of these.
Landscape, Portrait, and Macro
Landscape Mode: This mode is tailored for capturing expansive scenes. With settings that ensure a deep depth of field, both close and distant elements are in clear focus, perfect for vast terrains and scenic vistas.
Portrait Mode: As the name suggests, this mode is all about making subjects stand out. It adjusts settings to highlight a subject, typically by blurring the background, ensuring the focus is on the individual or object in question.
Macro Mode: Designed for close-up photography, this mode zeroes in on fine details. Whether you’re capturing the intricate patterns on a leaf or the delicate features of an ornament, Macro ensures clarity and precision.
Venturing Beyond the Basics
Whether you’re starting out or have been snapping away for years, these modes can offer a fresh perspective and a bit of fun if you’re lacking inspiration.
Why not have a play with your camera’s unique modes?
You might just discover a new favourite way to frame the world.
Conclusion: Dive Deeper into Your Camera’s Modes
From our exploration, it’s clear that camera modes are more than just settings; they’re gateways to creative expression.
We started with the ease of Automatic Mode, perfect for those quick captures when there’s no second to lose. Then, we ventured into Manual Mode, where every tweak and adjustment is at your command, letting you shape the shot just as you imagine.
In between, we discovered the balanced world of Aperture and Shutter Priority Modes. They’re like the best of both realms, giving you control in certain areas while still lending a helping hand where needed.
What’s exciting is the potential each mode holds, especially in the realm of landscape photography.
One day you might find Automatic Mode nails the shot, while another day, Manual lets you capture the mood just right.
Now, with this newfound knowledge, it’s over to you.
Experiment, explore, and don’t be afraid to mix things up.
Remember, every landscape tells a story, and with these modes at your disposal, you have more ways to narrate it.
So, get out there, let your camera be your guide, and see where your creativity takes you.
This article was all about exploring camera modes for new photographers and I truly hope you’ve found it helpful.
Let me know in the comments below.
That’s it for now – Keep clicking and sipping 📷 ☕️ 🍷
Like this post? PIN it so you can save it for later

Other Helpful Articles:
- Understanding Exposure: Landscape Photography Exposure
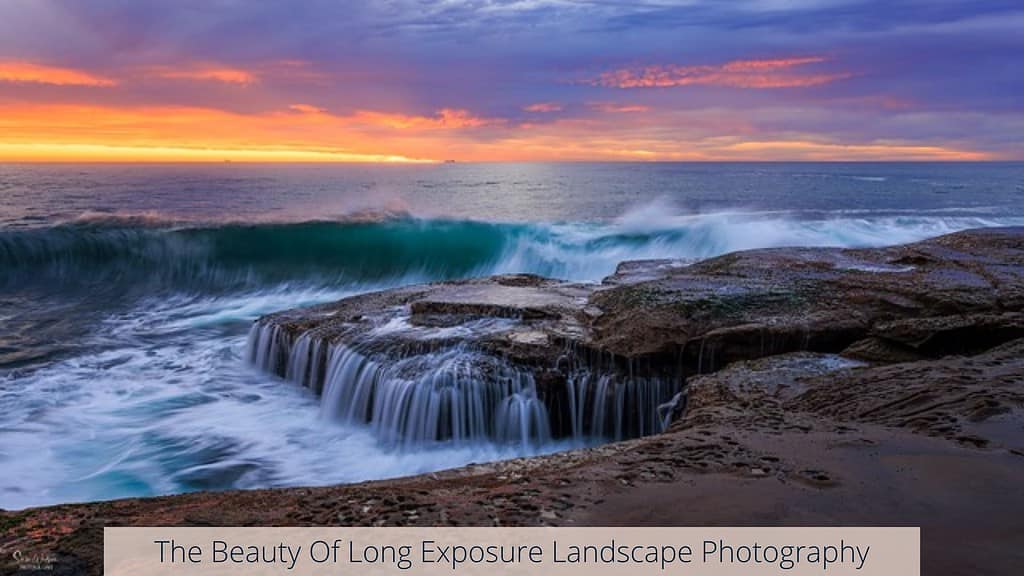
- The Beauty Of Long Exposure Landscape Photography
- Exposure Compensation: How To Use It For Better Landscape Photos
- Camera Settings For Landscape Photography: Complete Guide
- Skill and Vision in Landscape Photography: More Important Than Gear
Don’t miss a post – sign up Here if you haven’t already
Are you a beginner landscape photographer looking to improve your skills and capture stunning photos of nature?
If so, The Landscape Photography Handbook – Exploring the Wonders of Nature is the perfect guide for you.
In this 90-page ebook, you’ll learn everything you need to know to get off auto mode and start using manual settings to capture stunning photos of nature.