Travel Landscape Photography: Tips to get Great Photos When Travelling
12 Tips For New Photographers
This post has been created for you new photographers so you can improve your travel photography, particularly landscape images.
Do you love to travel and want to come home with better photos? This post is just for you!
So you’ve got an amazing trip coming up, and of course you want to come home with stunning photos to match! I’m sure you’ll see many beautiful scenes, and you want to capture them in a meaningful way. And share photos that you’re proud of from all the wonderful places you’ve visited!
Taking photos of beautiful and unique landscapes is one of the most rewarding things about travel photography. It allows us to capture special moments and helps us to remember those experiences for years to come.
With a little planning and learning some basics, you’ll come home with stunning photos.
In this article you will find my top tips that will make all the difference in taking your travel landscape photography to the next level.
Let’s get started …

Plan Your Shots
First up is, yes you guessed it, planning …
The best photography really does come from having a plan. That’s especially the case when it comes to landscape and travel photography. You need to be at the right place at the right time to get the right conditions, particularly for golden hour photography.
This starts when you are planning your trip.
What do you want to achieve, not just from your photography, but your travels? This will drive your photos along the way.
If you’re looking for some guidance on choosing your next travel destination, I’ve got you covered with this post – Choosing A Travel Destination.
Are you wanting to keep moving throughout your whole trip to see as much as possible? Or do you want to travel slower and really immerse yourself in the places you are visiting? Of course, there are so many variations in between, but you get the idea.
The photos you want to take will flow from these goals.
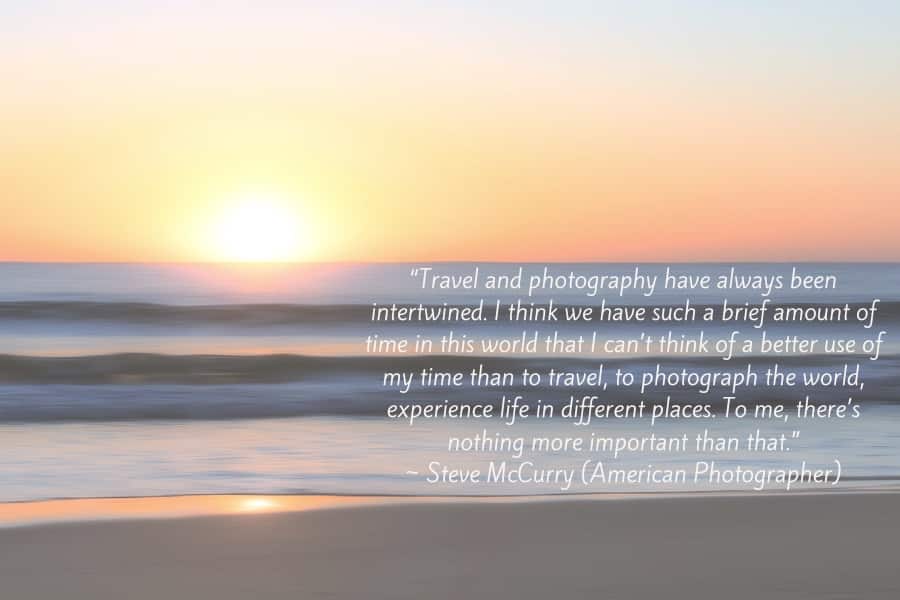
“Photography isn’t about just pushing that button. It’s about the experience of being there.”
~ Don McCullin, British Photojournalist
All photos tell a story. That story could be as simple as saying ‘look what I saw’, or as complex as showing more intimate details of where you visited.
So before you head off to your destinations, spend some time planning out the images you want to capture and exploring your travel photography ideas.
If you’re looking for inspiration you can head to Instagram, Pinterest, Flickr, Google and other travel blogs. Research some of these, then plan your trip around the best times to shoot (usually sunrise or sunset).
TIP – Create a list of all the general and specific areas you’ve researched, including a little extra information about each location so you know what to expect.
There are many other tools and tips to help with this so to plan your next photography shoot. So check them out to make your planning so much easier.
Get Up Early – Stay Out Late
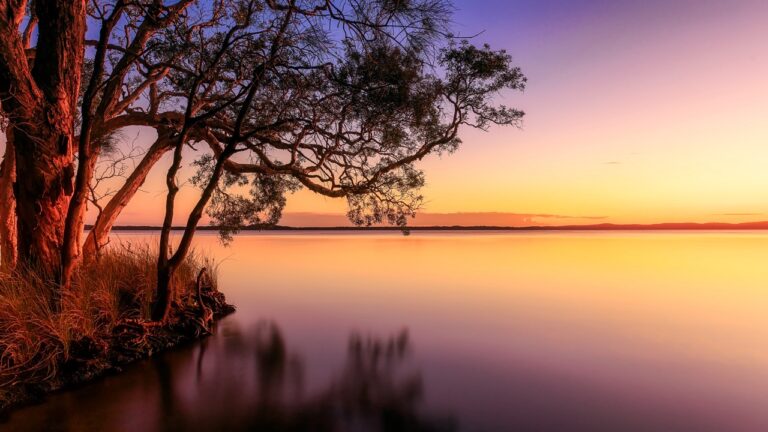
The rising or setting sun showcasing the environment in beautiful golden light is hard to top. It’s not by accident that this is called the ‘golden hour’.
Light is an important element of great photos, and the best light for travel photography, particularly landscapes, us usually early mornings and evenings.
At low sun, the light is golden and soft, so shadows and highlights are less intense than at other times of the day.
An advantage of being up early is that it is more likely you’ll have a popular and tourist destination to yourself. We’ve all heard that the early bird gets the worm, and that is especially true in travel and landscape photography.
Tip – Don’t rush off even if it looks like sunrise or sunset may not be wonderful, wait around for a bit. You can’t predict when the clouds are going to break or the sky will light up in spectacular shades.

Know Your Gear
Regardless what type of camera you use, yes even your phone, it really pays to get to know your gear.
Take the time to read the instructions, watch some tutorials, play around and go through all the settings. It’s digital photography so it’s easy to delete whatever doesn’t work, and you can often create some really cool effects.
Learn your menu so you can quickly change settings when you’re out and about. Timing can be critical and you don’t want to miss the shot by fumbling with your settings.
The more you do this, the quicker you will get and the more your photos will improve. It really does become second nature.
It’s definitely not essential to have the most expensive gear, but it is important to learn how to use what you do have.

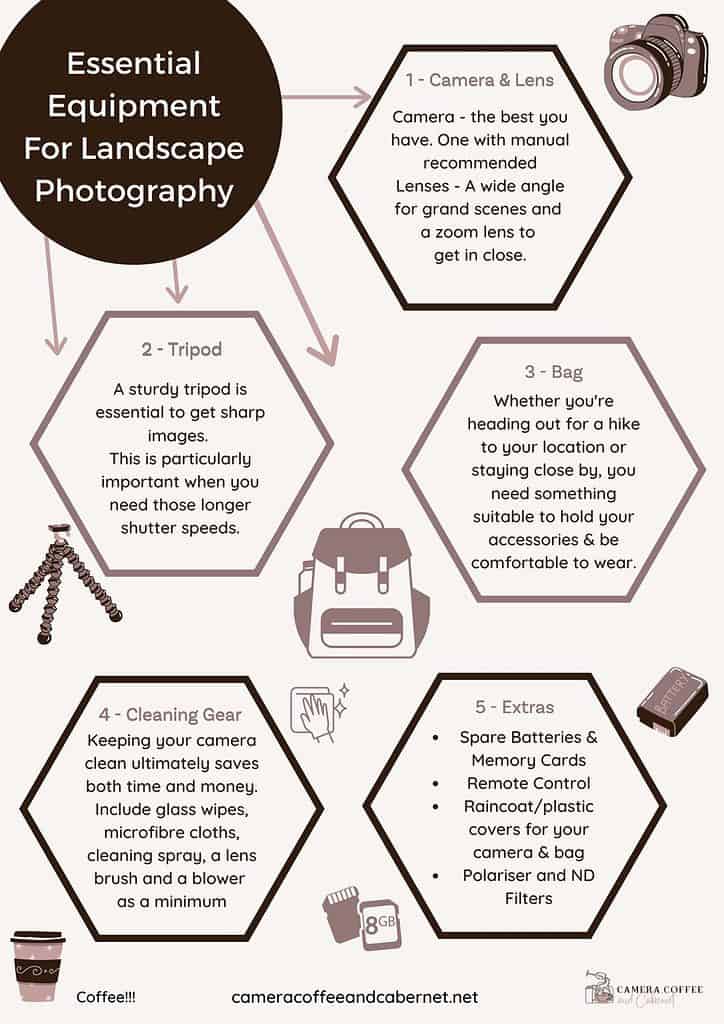
Essential Travel Photography Gear
Travel as light as you can. While this doesn’t matter so much on a road trip, it can become tricky when you’re faced with airline bag limits.
The other advantage of packing lightly makes your outings so much easier. It’s not a lot of fun lugging heavy equipment around for hours.
Having said that, a tripod is still essential. There are lots of fabulous lightweight tripods on the market, and you don’t have to take it everywhere with you.
With regards to the rest of your gear, it really depends on the type and length of your trip.
It can be tempting to pack every piece of gear you can think of, but this is just not always practical.
Depending on the type of camera you have, if you do have a selection of lenses, consider only taking one or two. A wide angle for grand scenes and a telephoto to give you more capabilities to zoom for more intimate scenes. Another lens to consider is a more broad lens covering mid to long zoom. I’m a Canon user so that would be the 28-300mm lens, so think something equivalent along those lines.
A dedicated camera bag is definitely your safest option, and I do recommend taking your filters. They really don’t take up much space or weigh a significant amount.
Apart from cloths and cleaning gear – check out my post on Essential Landscape Photography Gear to choose what is most appropriate for your trip.
TIP – Always remember extra batteries – and don’t forget to pack your charger!
Learn The Technical Basics Of Photography
Most of us start out in automatic, and that’s ok.
Just don’t stay there forever …
It can be a good idea to start in automatic, particularly if you are in unfamiliar situations.
Then, take note of the image and the settings that the camera used. They definitely won’t give you the best results most of the time, but it gives you a good starting point.
To really improve your travel photography though, you really will need to learn some of the fundamentals of photography.
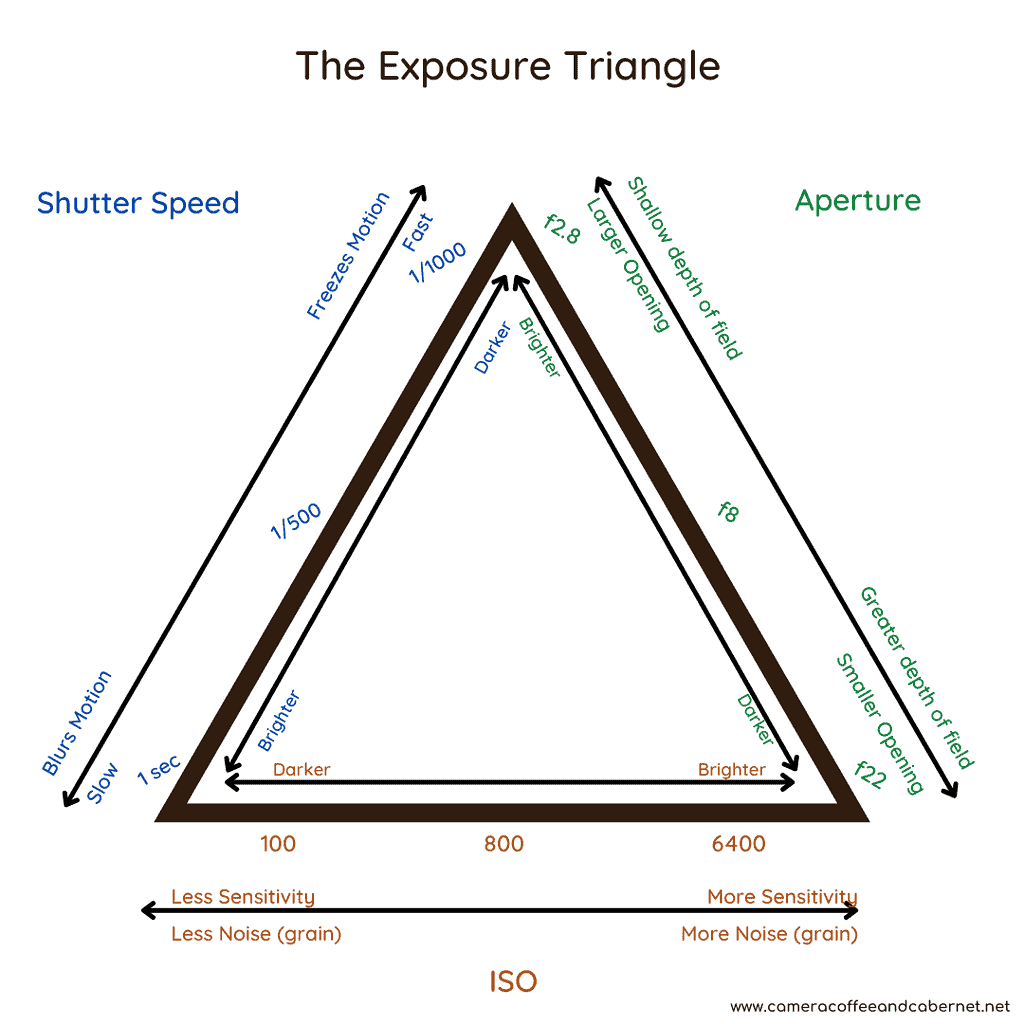
The basis of all photography is learning the exposure triangle. This is based on the three main elements of ISO, shutter speed and aperture. Learning what each of these do, and how they work together to create the correct exposure is critical.
As a new photographer, this is how these three elements impact your exposure:
ISO: this adjusts how sensitive your camera sensor is to light
Shutter Speed: how long the shutter is open when it takes an image
Aperture: adjusts how much light the camera lets in.
I really do suggest that you practise with this a lot to give you a solid foundation of how these elements work together.
It’s also highly recommended to study some videos, or even better, sign up for a basic course or workshop.
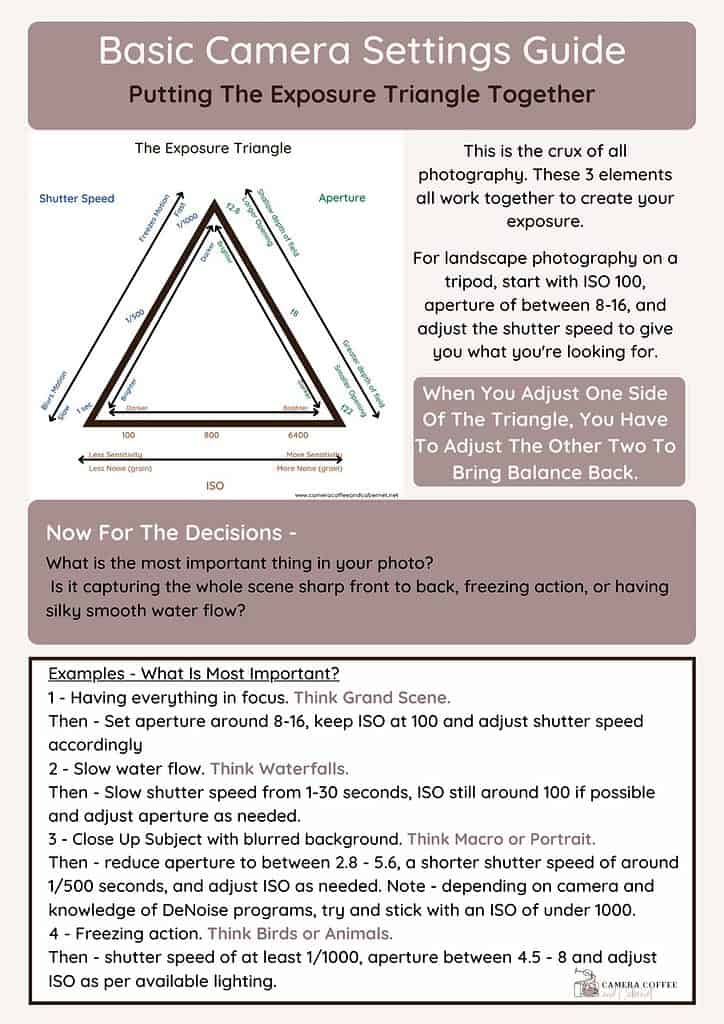
TIP – Basic Settings For Travel Photography
There really are too many variables to give you exact camera settings for each situation, but here is a starting point to use as a guide:
Set your aperture between f8 – f16, ISO as low as possible, and adjust your shutter accordingly. Anything with a shutter speed less than say 1/100 will benefit from using a tripod due to camera shake. This can vary greatly from person to person, so get familiar with the lowest shutter speed you are comfortable with.
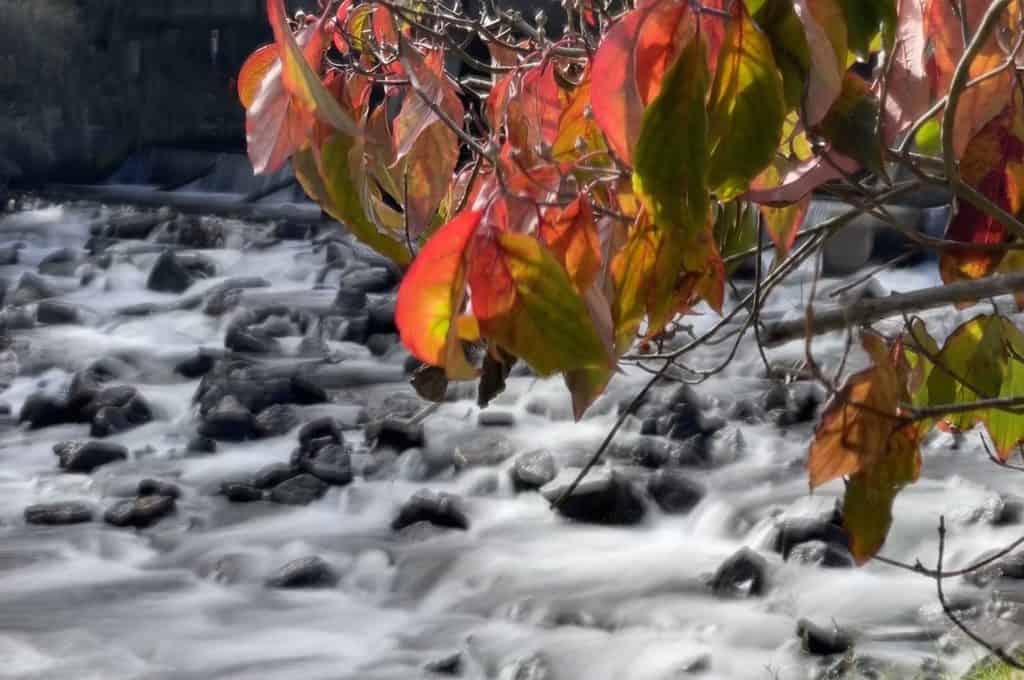
Keep Your Photos Sharp
Despite this obvious tip, even experienced photographers can take blurry photos if they aren’t careful when shooting travel photos.
Camera shake is when a photo comes out blurry because the camera moved while the image was being captured. This usually happens with hand held images with a low shutter speed. It can also happen if it’s windy or you’re standing on something that’s moving like a boat.
Just because your camera says you can shoot a photo with a low shutter speed, doesn’t always mean you should. It doesn’t know that you’re not using a tripod or you may not be super steady when taking your images. Some can shoot steadier than others – give me a tripod anytime!
The best way to avoid this is to use a tripod, but this is not always practical. If you don’t have a tripod, see if there is somewhere close that you can sit your camera on and use a self timer. This way you’re not touching the camera as it’s taking the image.
If your lens has image stabilisation, make sure this is switched on.
If you’re out exploring and shooting hand held, then you will need to increase your shutter speed. You may need to also increase your ISO along with this so your photos don’t end up too dark.
This can cause more noise (grain) in your image, but this is better than a blurry photo!
Shoot in RAW if possible
If you really want to get images with a higher quality, then I recommend you shoot in raw format instead of JPEG.
When you shoot in JPEG, the camera automatically processes and compresses your file. A raw image is an unprocessed file that contains more information, which gives you more flexibility in post-production.
Most cameras, including phones, usually have the option to shoot in raw as well. So this is not just for fancy expensive cameras.
Raw files will be a lot bigger, and require software to edit, so you need to keep this in mind.
If you don’t have any plans to edit your photos, then stick with JPEG.
I would suggest you set your camera to shoot in both raw and JPEG. This way you can easily share your photos on the go. You will also have a raw copy that you can come back to and edit at any time in the future.
Composition
Composition is critical to improving your travel photography as it determines the overall visual impact of your image.
The composition of a photo refers to the way that the elements within the frame are arranged. This includes things like where you place the horizon, the use of leading lines, and the balance of light and shadow.
Composition really is one of the most difficult things to master with any type of photography, and it can really pay off to learn this early on. Your camera can take you so far with technical settings, but it can’t help with composition.
There are several ‘rules’ you can learn to improve your photos. These include: don’t put your main subject in the middle of your photo, don’t cut elements off, keep it simple etc.
But it really isn’t that easy, so really take the time to learn what creates a good composition.
I strongly recommend the ebooks created by landscape photographer Mads Peter Iversen.
You can start with his free ebook here – Landscape Composition.
Also check out his Youtube channel.
Always Have Your Camera With You
This may sound obvious, but you should really have your camera with you everywhere you go.
And not just have it with you, make sure you always carry a spare battery and memory card with you – they tend to run out right when you’re not expecting it.
The best opportunities for photos really do often happen right when you’re not expecting them, and quickly! You never know what might pop up in front of you so it pays to always be prepared.
Along with anything truly worth learning, improving your travel photography will come naturally the more you practise.
Also, the more photos you take, the more chance you have of some of them being images you’ll be proud of. They are digital after all so it really doesn’t matter how many photos you take. Just experiment, and make sure you have plenty of memory cards!
Yes, this post is primarily focussed on landscape photography, but make sure you mix it up and take photos of all kinds of subjects. Photography everything that catches your eye!
TIP – While you’re out and about, take snapshots of the signs at all the locations you visit. This will give you an accurate record when you get home. This is particularly important on a long trip.
All those different locations you visit can too easily blend in. Trust me on this one.
I usually just do this with my phone – way more useful than a selfie! Although, don’t forget to have some fun and take selfies if that’s your thing. You do you …
Backup/Workflow
I would hate for this to happen to anyone, but you could lose or damage your camera and lose the images you’ve taken. Back up as often as you can (at least daily), and keep them separately to your camera bag.
At the end of the day, upload your photos to your laptop (or portable hard drive) and charge that battery.
Personally I copy them to both so there are two copies. Alternatively, have several memory cards that can be changed regularly and not deleted until safely backed up once back home.
I really can’t stress the importance of having a photography workflow when you are travelling.
Always Be Respectful
Ok, this tip is not directly about improving your travel photography. Actually it applies no matter when or where you are photographing. Iit is important to be respectful of the people and places that you are photographing.
Here are some simple things to keep in mind:
- Always ask permission – this can apply to photographing someone’s property as well as photographing people themselves.
- Be aware of local customs and traditions. This doesn’t just apply to overseas travel, so if in doubt, ask.
- Avoid disturbing the scene. Don’t move anything – move your feet, or learn how to remove things in editing later.
- Be considerate. Always be mindful of others around you, and try not to block anyone’s way or intrude on their privacy.
Simply being kind and asking first can go a long way, just like so many things in life.
Protect Your Gear
This kind of goes without saying, but you really do want to make sure you keep your gear safe.
The risks of having your gear stolen vary depending on the location (s) that you’re visiting. Do your due diligence, research your locations, and take appropriate steps to minimise this risk.
A few simple tips when out with your camera are to have a non-flashy camera bag, use a strap, and even keep your camera out of sight wherever possible.
As regards to protection, it’s not just about theft. It’s also about your equipment being damaged in transit. Wherever possible I keep my camera gear in carry on, and place it under my feet at all times. If it must be placed in check in, make sure it’s well padded, and consider specialised cases made just for this reason.
Travel insurance is a must, but also consider general insurance to protect your gear. You can be covered for theft, and also accidental damage. Well worth it for the peace of mind it brings.
Now, I wasn’t going to talk about this, but …
Editing – The Final Piece For Improving Your Travel Photography
I know this can be a controversial topic, so if editing isn’t something you’re interested in, just skip to the next section. No judgement here!
Every single photo that you see, whether online or physical, has been edited in some way. Just some much more than others …
It can be as simple or as complicated as you would like it to be. This post is not going to delve into any details, but it had to be mentioned.
I actually enjoy editing my images (most of the time) – it’s all part of the process.
Editing your images really can make a big difference to your photos.
Even if you’re shooting JPEG, your images are still edited, you’re just letting the camera do the work for you, and any additional editing is optional.
If you are shooting in raw, however, you will have to do some editing before you can share or print your images. This is purely due to the file format as it’s inconsistent with most mainstream programs.
There are an incredible number of editing software programs out there, and relevant tutorials out there if you’re interested in learning more about this.
I actually enjoy editing my images (most of the time) – it’s all part of the process.
Bonus Tip – Don’t Forget About Your Photos When You Get Home
It’s so easy to neglect all those wonderful memories you’ve created on your trip once you get back home and into your routine.
Make your photos a priority as soon as you can, and start going through them. You spent all this time carefully creating them, so don’t forget to do something with them!
Go through your usual photography workflow like with every other shoot. Save, edit, share and print.
Hang some on your wall as a reminder of your epic trip and consider making a book or gifts for others. Here are some really great ideas to creatively print your photos.
You will definitely make mistakes along the way as I have. The main thing is that you get out there, document your trips with your camera and enjoy the journey. And give yourself a pat on the back for all the improvements you’ve made with your travel photography.
Finally, have an incredible trip. And remember, as much as you want to come home with amazing images to reflect your trip, don’t focus so much on that that you don’t fully enjoy the journey. Make sure you stop and enjoy the experience along the way.
I truly hope you’ve enjoyed these travel tips and that you come home from your next trip with photos you are proud of. Make sure you share them!
What are your travel photography tips that you use to take amazing travel photos? I’d love to hear, so please comment below.
That’s it for now – Keep clicking and stay caffeinated
Like this post? PIN it so you can save it for later.
Other Posts You Might Like:
- Essential Landscape Photography Gear
- Landscape Photo Editing Tools And Resources
- Photography Workflow
- Travel Planning
- Timing Your Landscape Photography
- Packing For Your Next Photography Trip: How To Decide What To Take
- Travel Resolutions
- Choosing Your Next Travel Destination
- Travel Photography Shot List: Essential Photos for Your Adventures
Don’t miss a post – sign up Here if you haven’t already
Note – This post does not contain any sponsored or affiliated links. All suggestions and opinions are mine. Unless otherwise stated, all photos are mine and remain my copyright images – Sam Wilson Photography.