Using Neutral Density Filters To Improve Your Landscape Photos
Make your landscape photography stand out with ND Filters
Want to know more about how neutral density filters can improve your landscape photography? These top tips will have you master long exposures and start taking better photos today!
But what are neutral density filters, and how can you use them to improve your photography?
In this article, you will learn everything you need to know about Neutral Density (ND) filters to get started.
We will cover what they are, recommended ND filters you need in your kit, and tips on how to use them for maximum impact.
Let’s dive into this article all about neutral density filters, starting with a definition of what they are …

Ever looked at a landscape photograph with smoothly flowing water or stretched-out clouds and wondered about the magic behind it?
A lot of that magic can be credited to Neutral Density (ND) Filters. When I delved deeper into landscape photography, these became indispensable tools in my kit.
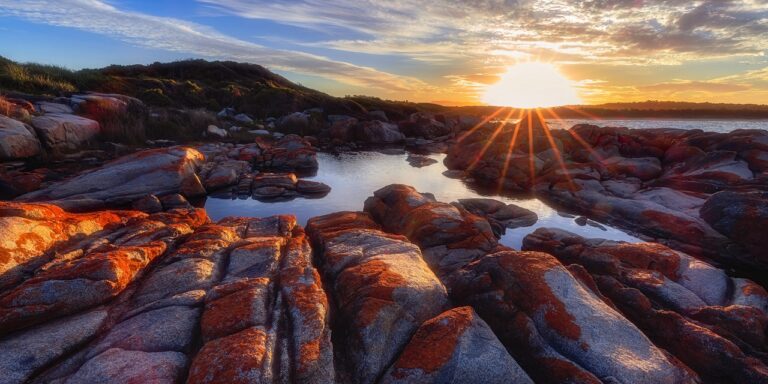
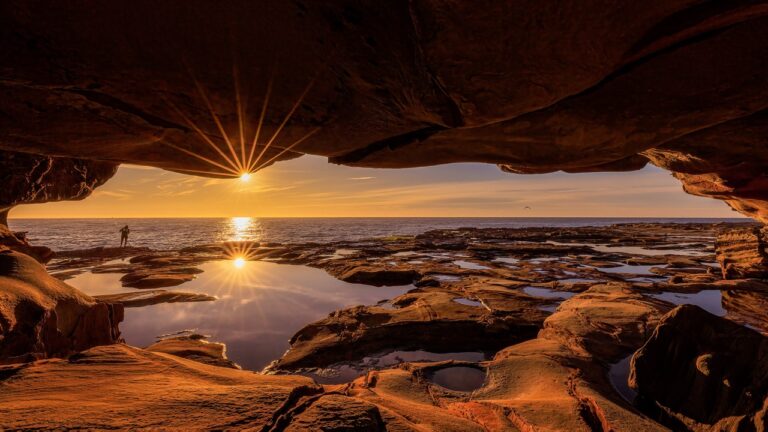
My introduction to neutral density filters was during a photography tour to Tasmania – I duly purchased them before the tour and had no idea why – another case of all the gear and no idea for me!
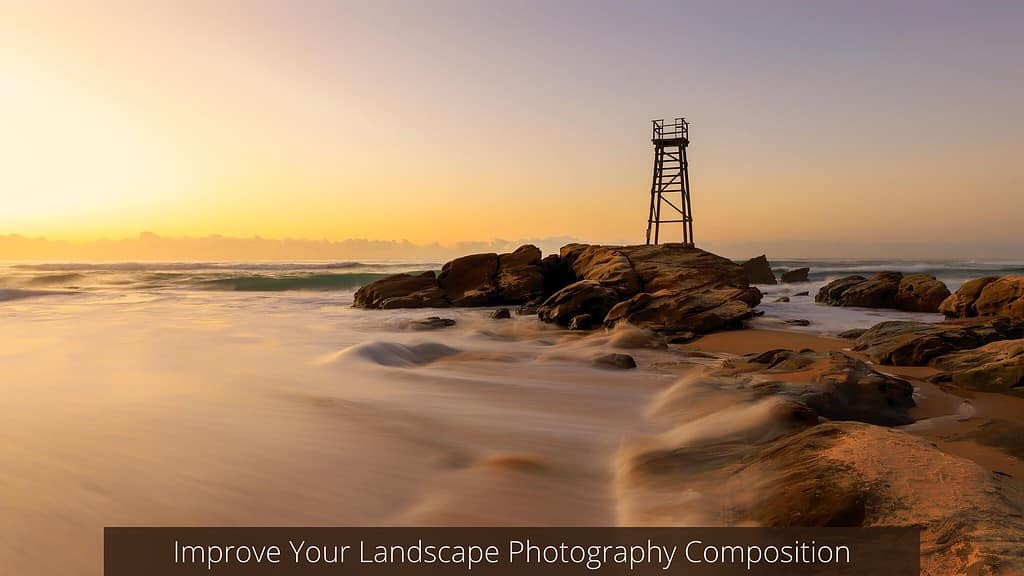
But, my mind was blown on our first shoot when we visited Mortimer Bay for a sunset shoot and I was able to create this image just below.
It is an exposure of 30 seconds, something I had no idea was even possible. I’ve since taken much longer exposures using neutral density filters, but it was this experience that had me hooked.
At its core, an ND filter acts as a light-reducing agent. Think of it like sunglasses for your camera. It selectively reduces the amount of light that enters the lens without altering the colours. This is pivotal for landscape photographers like us.
Why? Because in brightly lit conditions, capturing movement becomes challenging. If you’ve tried photographing a cascading waterfall on a sunny day, you know the struggle.
Too much light means shorter exposure times, which doesn’t allow for capturing that beautiful, silky water effect. Here’s where the Neutral Density filter steps in.
By limiting light, it permits longer exposure durations even in broad daylight, enabling us to record motion in a dreamy, surreal manner.
In essence, ND filters give landscape photographers a broader artistic canvas. They allow us to manipulate time in our photographs, capturing the dance of clouds, the journey of rivers, or the serenity of a tranquil lake in ways our eyes can’t perceive but our cameras can capture.
Different Types Of Neutral Density Filters
Diving into landscape photography, you might hear about various types of neutral density filters.
Each has its unique role, and understanding them can make a big difference in your shots. Let’s break them down:
1. Fixed Neutral Density Filters
These are the straightforward ones. Fixed neutral density filters reduce light in a consistent way, no matter where or how you use them. They’re great for times when you want to capture moving water or clouds, giving your photos that dreamy look.
2. Variable Neutral Density Filters
Think of these as adjustable sunglasses for your camera. With a simple twist, you can decide how much light you want to block out. They’re handy when lighting changes, but they might not be as precise as the fixed ones.
3. Graduated Neutral Density Filters
Imagine a filter that’s darker at the top and gradually becomes clear at the bottom. That’s the graduated neutral density filter.
Perfect for scenes where the sky is bright but the ground isn’t—like during a sunrise or sunset. It helps balance the photo so both the sky and land look just right.
Using neutral density filters can add a touch of magic to your landscape photos. While each type has its use, the fun part is trying them out and seeing the results for yourself.
When To Use A Neutral Density Filter
So you understand the benefits of using a neutral density filter, but you might be wondering about the right moments to actually put it to use.
From capturing the movement in waterfalls and clouds to taking advantage of the golden hours at sunrise and sunset, knowing when to use your neutral density filter is crucial for achieving stunning landscape photos.
Let’s explore some of these key situations.
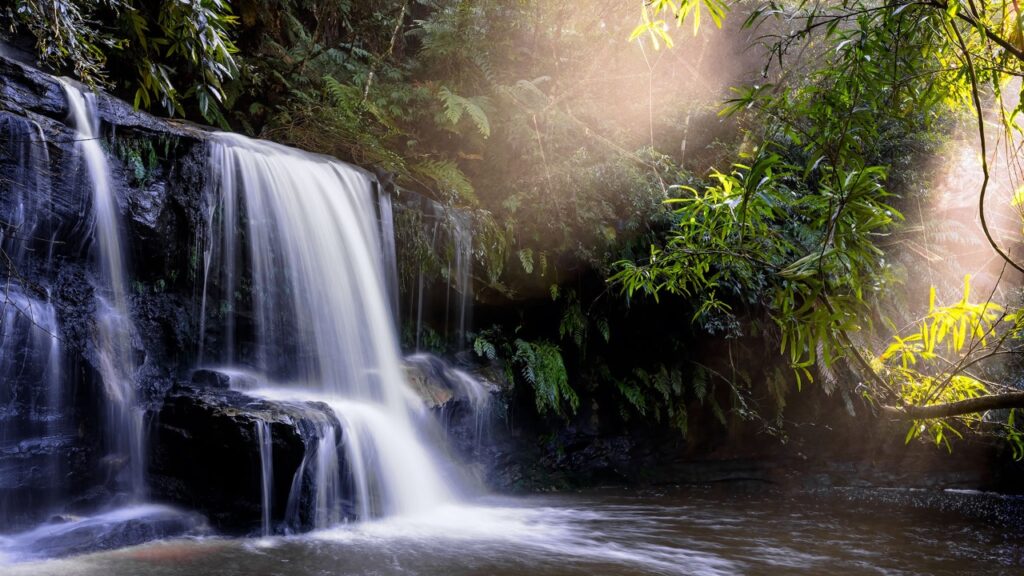
Silky Waterfalls and Streams
Neutral density filters are your go-to when you want to transform rushing water into a smooth, ethereal flow.
A slower shutter speed allows you to capture the water’s movement, creating that silky, dreamy effect often seen in professional landscape photographs of waterfalls and streams.
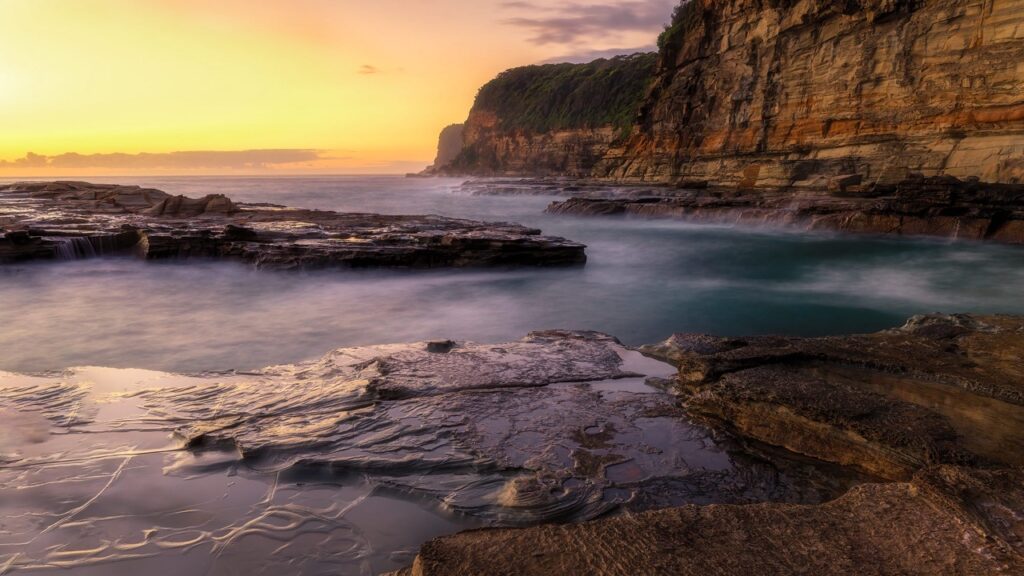
Smooth Ocean Surfaces
For ocean landscapes, a neutral density filter can help you achieve a serene, glass-like surface, smoothing out waves and ripples. This creates a calming effect, allowing the viewer to focus on other elements like rocks, boats, or the horizon.
Blurred Cloud Movement
If you’re aiming to capture the sky’s ever-changing drama, a neutral density filter enables longer exposures that make clouds appear to streak or flow. This adds a dynamic layer to your skyscape, emphasising the passage of time and movement.

Wide Aperture in Bright Conditions
When shooting in bright conditions but desiring a shallow depth of field, a neutral density filter lets you use a wide aperture without overexposing your shot. This is perfect for isolating subjects like specific trees or rocks against a softly blurred background.
Sunrises and Sunsets
Neutral density filters are invaluable during sunrise and sunset, helping you manage the contrast between the bright sky and darker land. Longer exposures can also capture the colours transitioning through the sky, enhancing the ethereal quality of the ‘golden hours.’
Reducing Glare and Reflections
When photographing scenes with water or glass, a neutral density filter can reduce glare and reflections. This enables you to capture what’s beneath the surface, like aquatic plants in a pond or details inside a building.
Isolating Elements in Motion
If you’re capturing scenes with moving elements like swaying trees or fluttering birds, a neutral density filter allows you to use a slower shutter speed. This creates a blurred effect around the isolated subject, emphasising their motion against a stationary background.
Coastal Scenes
Coastal photography often involves dynamic elements like crashing waves or drifting clouds. Using a neutral density filter can help you soften these movements, adding a tranquil mood to your seascapes.

Snow and High-Alpine Photography
In high-alpine or snowy environments where the sunlight is particularly intense, neutral density filters help prevent overexposure. They allow you to maintain detail in both the snow and sky, avoiding washed-out or overly bright areas.
Sand Dunes
For photographing sand dunes, a neutral density filter enables you to play with light and shadow while maintaining exposure control. Long exposures can capture shifting sands in a unique way, blending the textures and lines to create a more abstract landscape.

Scenic Snapshot Using Neutral Density Filters
| Scenario | Effect | Suggested Filters | Tips |
| Waterfalls and Streams | Silky, flowing water | ND8, ND16 | Use a tripod to eliminate camera shake. Aim for a shutter speed of 0.5-2 seconds so there’s still some texture. |
| Ocean with waves | Smooth ocean surface, blurring waves | ND64, ND1000 | Ensure stability against winds and keep an eye on tides. |
| Moving clouds | Streaky or blurred clouds showing movement | ND64, ND1000 | Longer exposures make clouds more streaky. Take notice of how fast the clouds are moving. |
| Sunrise/Sunset | Smoothing water, or streaking clouds; reducing glare | ND8 up to ND1000 | Check exposure regularly as light levels change rapidly during these times. |
| Busy public places | Blur or erase people/crowds through moving scene | ND1000 | Especially useful for locations where you want to remove tourists from your shot. |
| Reflections | Reduce reflections on water surfaces | ND1000 | Usually a job for a polariser, a filter can help to remove any unwanted glare. |
| Daytime long exposures | Dramatic sky and cloud movement or soft flowing water | ND1000 | Look for elements that remain static to contrast with moving objects. |
| Shooting with wide apertures | Achieve shallow depth of field in bright conditions | ND8 | Helps avoid overexposing the shot when using wide apertures in bright light. |
Note: The ND filter numbers like ND8 and ND1000 etc represent the filter’s optical density and the amount of light they cut out. For instance, an ND8 filter cuts out 3 stops of light, allowing 1/8th of the available light to pass through, while an ND1000 filter cuts out 10 stops of light allowing only 1000/th of the available light through.
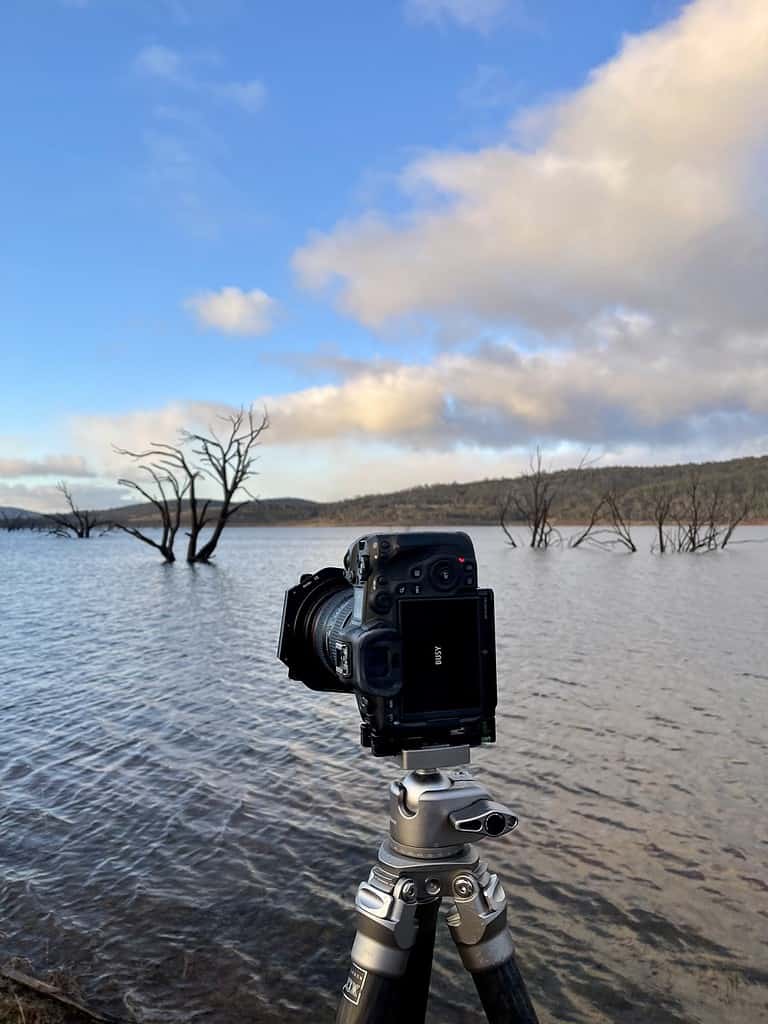
Trusty Tip: Always remember to use a sturdy tripod when shooting with neutral density filters to ensure sharp images!
Check out my favourite tripod here: Sirui Tripod Kit
Using Neutral Density Filters: Step-By-Step in the Field
So you’re familiar with the ‘why’ and ‘when,’ but what about the ‘how’?
Understanding how to use nd filters for landscape photography is the final piece of the puzzle.
This section will walk you through a step-by-step process, ensuring you’re well-equipped to capture those mesmerising landscape shots.
Preparing Your Gear
Before you head out, make sure you have all the equipment you’ll need: your camera, a selection of neutral density filters, a sturdy tripod, and any lens attachments. It’s a good idea to also bring along some lens cleaning supplies just in case.
Setting Up the Tripod
Once you’ve found your ideal location, set up your tripod on a stable surface. Ensure it’s level and all the locks are tightened. This prevents camera shake and makes sure you get those crisp images.
Framing the Shot
Mount your camera on the tripod and compose your shot through the viewfinder or the LCD screen.
Take your time to get the framing just right, as it’s the backbone of a great photograph.
Taking a Test Shot
Before you start messing with filters and settings, take a test shot at a regular exposure to review your composition, focus, and current settings.
It serves as a benchmark for the following steps.
Choose Your Filter
Based on your test shot, decide which neutral density filter will best achieve the effect you’re going for, be it silky water or blurred clouds. Insert the filter into its holder or screw it onto the lens.
Adjust Your Camera Settings for a Long Exposure
Now’s the time to adjust your camera settings. Switch to manual mode, set your aperture, and choose a low ISO for better image quality.
Calculate New Shutter Speed
Now, don’t get stressed thinking you have to have a maths degree to work this out.
There are lots of handy apps out there that do all of this for you.
All you do is choose the original shutter time (without your filter), the strength of the filter you’ve chosen and the app tells you what your new shutter speed is.
This is my go to app for this and it’s free: Nisi ND Exposure Calculator
Take The Photo
With everything set, it’s time to take your shot. Use a remote shutter or the camera’s self-timer to avoid any camera shake. Capture the image and breathe in the satisfaction of a job well done.
Review, Adjust, Repeat as Necessary
Check your photo for focus, exposure, and composition. If something’s off, adjust your settings and try again. This is a learning process, so don’t rush.
Additional Tips
Keep an eye out for changing light conditions, especially during sunrises and sunsets. Don’t hesitate to experiment with different settings or filters to get that dreamy shot you’re after.
Bonus: Suggested Filter Strengths for Different Scenes
Still pondering over which filter strength to use? Here are some suggestions tailored to a handful of typical landscape settings that you might find helpful.
Waterfalls and Streams
For waterfalls and streams, you can’t go wrong with a 3-stop or 6-stop neutral density filter. These will allow you to slow down the shutter speed sufficiently to give the water that magical, flowing appearance.
Moving Clouds
Capturing the ethereal movement of clouds often requires a longer exposure. A 6-stop or even a 10-stop neutral density filter can make this happen, giving your clouds that wispy, stretched-out look.
Wide Aperture in Bright Conditions
If you’re aiming to use a wide aperture to blur your background but find the conditions too bright, a 3-stop neutral density filter can do the trick. It reduces the light sufficiently to let you open up your aperture without overexposing your shot.
Sunrises and Sunsets
For these golden hours, a 3-stop or 6-stop neutral density filter usually suffices. The softer light conditions mean you don’t need an overly strong filter to achieve beautiful colour gradients and cloud movements in the sky.
Feel free to treat these as starting points, and by all means, experiment to find what suits your specific scenario best.
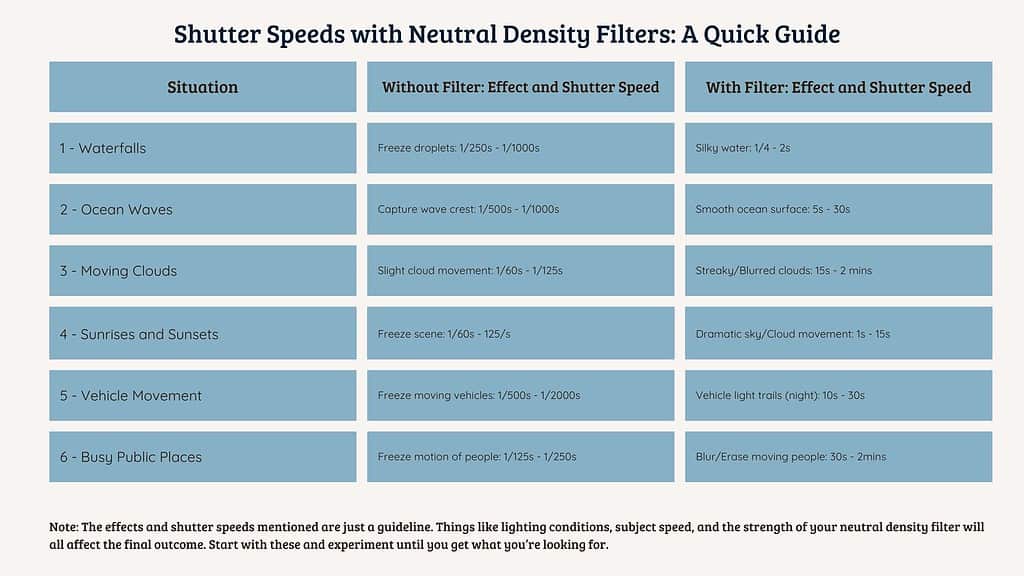
Shutter Speeds with Neutral Density Filters: A Quick Guide
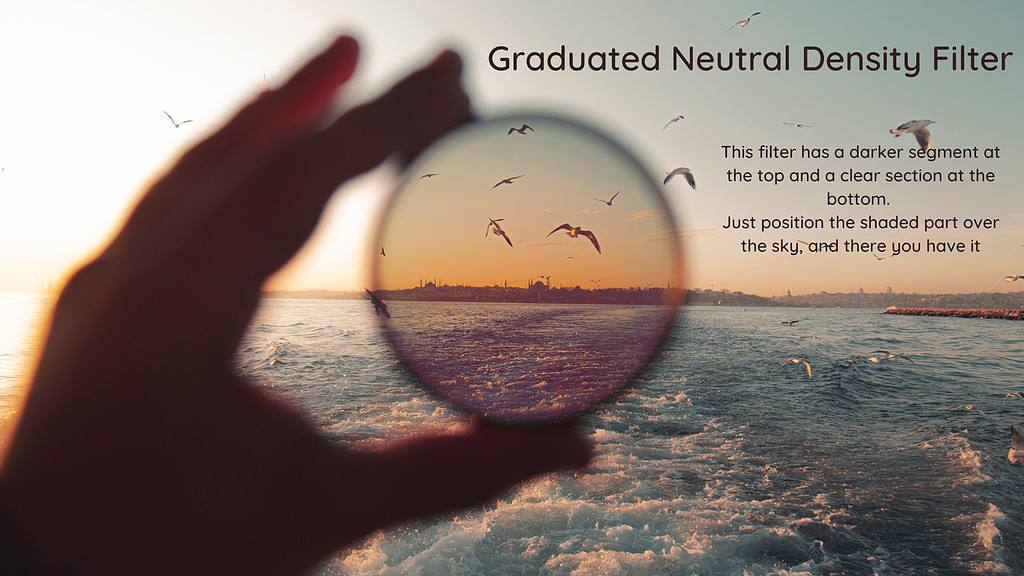
Using Graduated Neutral Density Filters
We mentioned graduated neutral density filters earlier, but when is the optimal time to use them? These particular filters excel in situations with uneven lighting – such as a luminous sky juxtaposed against a darker foreground like mountains or fields.
When to Use Them
These filters come into their own during sunrise and sunset photography. The sky is often significantly brighter than the land, creating a challenge in achieving a balanced exposure. They’re also invaluable in mountainous terrains, where the sky takes up a large portion of your frame and runs the risk of becoming overexposed.
How to Use Them
Setting up a graduated neutral density filter is straightforward but requires attention to detail. One half is tinted, and the other is transparent. Your task is to align the tinted half with the brighter section of your composition – most often the sky. This action balances the exposure between the sky and the foreground, achieving a uniformly lit image.
It’s a good practice to continually adjust the filter as lighting conditions shift, keeping an eye on your camera’s viewfinder or LCD screen to fine-tune the setup.
Common Mistakes to Avoid
So, you’ve got the basics down, but what should you absolutely steer clear of when using neutral density filters in your landscape photography? Here are some tips.
Using the Wrong Filter Strength
It might be tempting to use the strongest filter you have for every shot, but this can lead to unnaturally long exposures that lose the essence of the scene.
Ignoring Colour Cast
Some lower-quality neutral density filters can introduce a colour cast to your photos. Be sure to do your research before purchasing.
Forgetting to Focus First
Remember to set your focus before attaching the filter. Most cameras struggle to auto-focus with a dark filter in place.
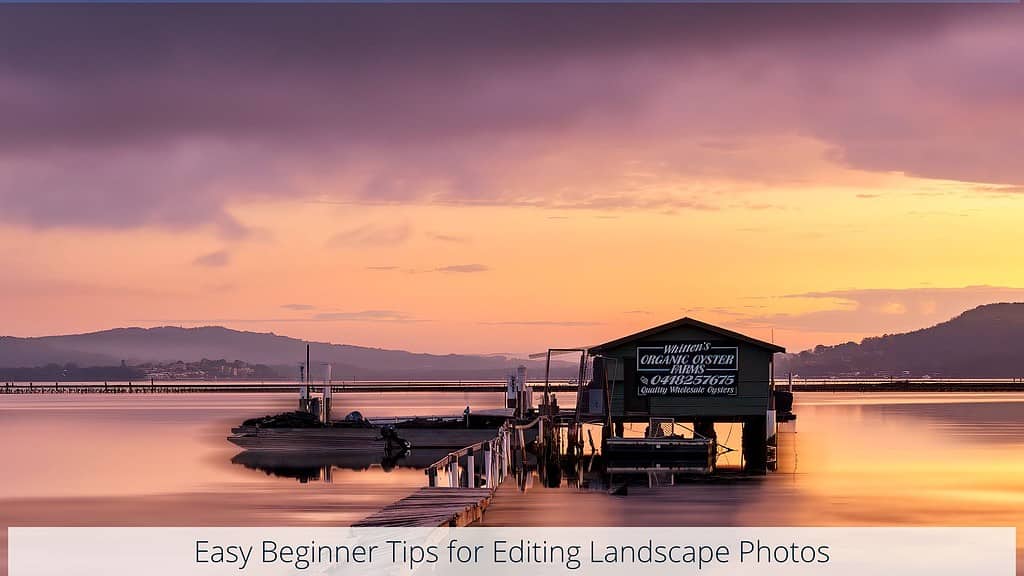
Post-Processing Tips
After you’ve successfully captured your long-exposure masterpieces, you might wonder what post-processing steps will make your photos truly stand out.
Exposure Adjustments
Your neutral density filter will do most of the work in balancing exposure, but minor adjustments in post-processing can add that extra touch of brilliance.
Saturation and Contrast
Long exposures can sometimes produce washed-out colours. Boosting the saturation and contrast slightly can revive the vibrancy in your photos.
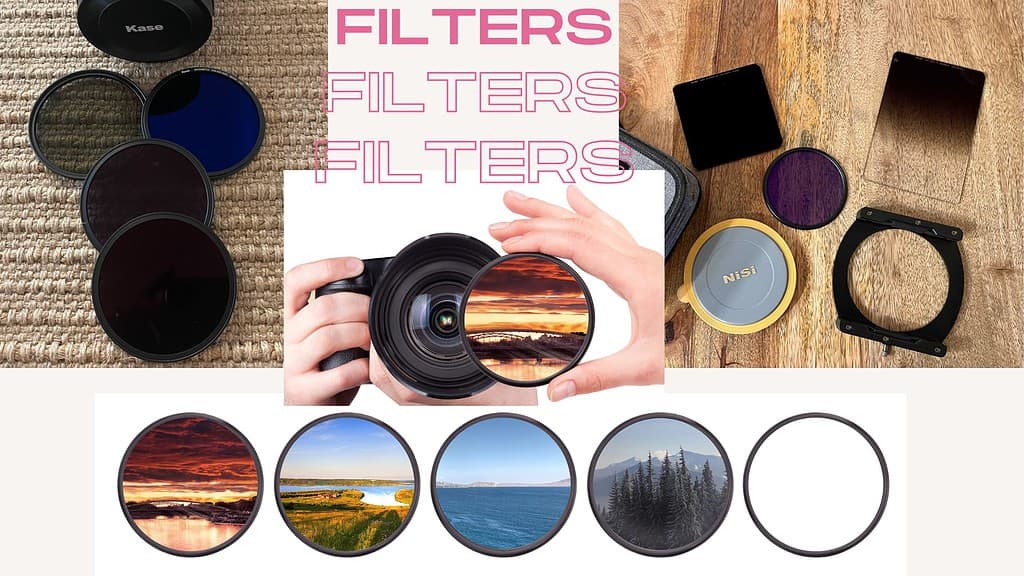
Recommended Neutral Density Filters to Get Started
If you’re just diving into the world of long-exposure landscape photography, choosing the right neutral density filters can be a daunting task. Here are some recommendations to help ease you into it.
If you do decide to purchase filters for your photography, consider purchasing a good quality starter kit. I would recommend either the magnetic filters or the square system with a holder.
While cheap options may seem like a good option to start with, they can cause a colour cast on your images, and you will want to upgrade in no time.
It is a good investment if you’re keen on your landscape photography. I honestly wouldn’t be without mine.
Check out my recommended Nisi Filter Kit Here: Nisi Filter Kit
FAQ’s
Can I Stack Multiple Neutral Density Filters?
While technically possible, stacking multiple neutral density filters may introduce issues like colour cast or vignetting. If you need a stronger effect, it’s better to use a single, higher-strength neutral density filter.
Do Neutral Density Filters Affect Image Quality?
High-quality neutral density filters should not significantly impact your image quality. However, cheaper filters might produce colour casts or reduce sharpness. Always invest in good quality filters to ensure the best results.
What’s the Difference Between a Circular and a Square Neutral Density Filter?
Square filters require a separate holder and can be more cumbersome to set up. Circular filters screw directly onto your lens, making them more convenient. Square filters, however, offer the advantage of being able to easily stack with others, like graduated neutral density filters.
Is a Neutral Density Filter the Same as a Polarising Filter?
No, they serve different purposes. A polarising filter reduces glare and reflections, while a neutral density filter reduces the amount of light entering the lens. Some photographers do use both in tandem for specific effects.
Can I Use Neutral Density Filters for Other Types of Photography?
While this article focuses on landscape photography, neutral density filters can also be useful in portrait, street, and architectural photography, especially when you want to control motion or depth of field.
How Do I Clean and Maintain My Neutral Density Filters?
Use a lens cleaning solution and a soft, lint-free cloth to gently clean the surface. Always store your filters in a protective case to avoid scratches and damage.
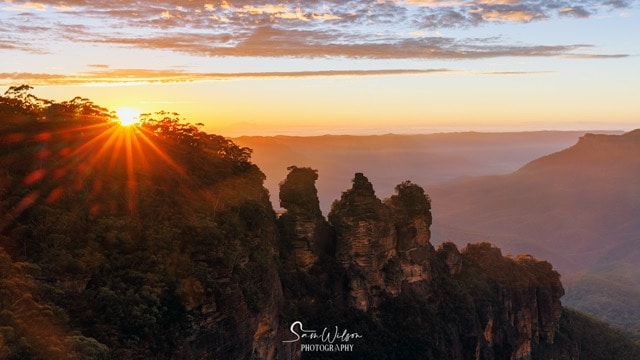
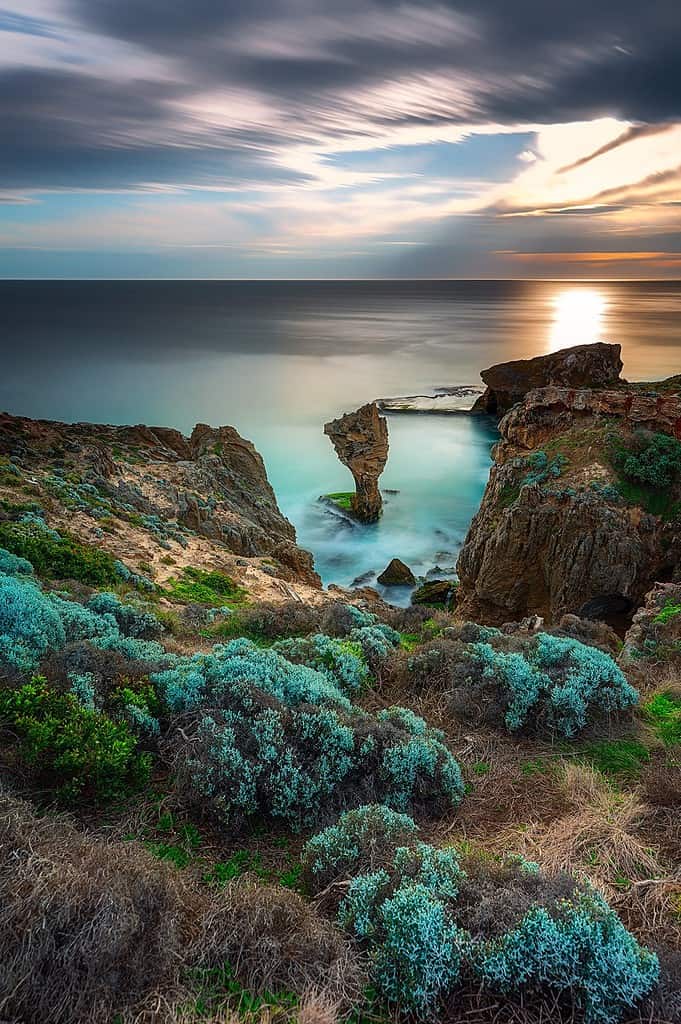
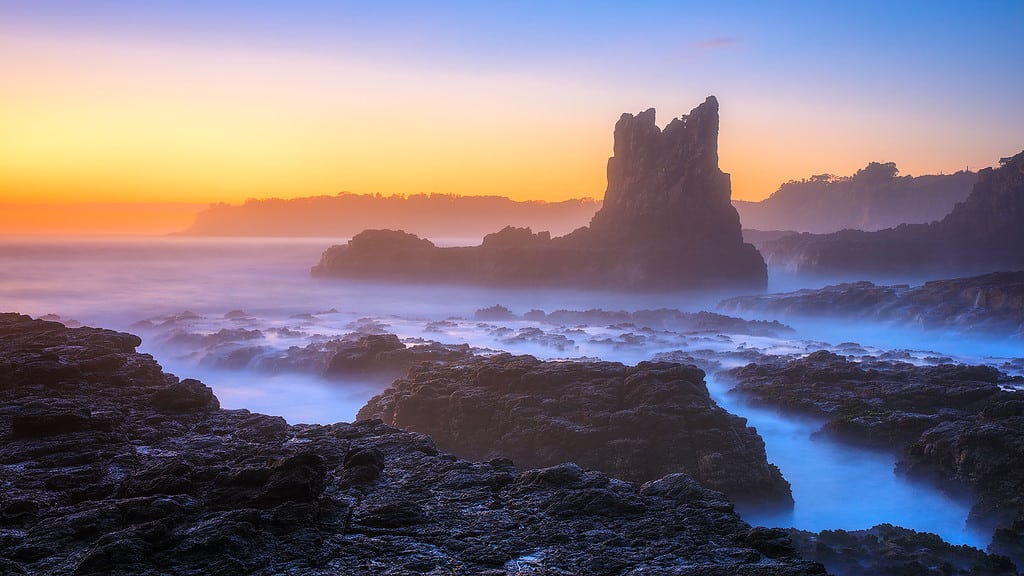
I love neutral density filters because they help me take photos like this and I honestly wouldn’t go without them:
Conclusion
This article was all about Using Neutral Density Filters To Improve Your Landscape Photos
So, there you have it – a comprehensive guide to using neutral density filters in landscape photography.
From the types of filters and their applications to a detailed step-by-step guide for field use, we’ve covered the essentials.
And let’s not forget those handy tips on choosing the right filter strength for various scenes.
Whether you’re aiming for ethereal waterfalls, dramatic cloud movement, or just want to keep overexposure at bay, neutral density filters can be your go-to tool to elevate your landscape shots to the next level.
But hey, the world of photography is ever-evolving, and there’s always more to learn.
So if you have any questions, thoughts, or even some killer tips of your own, drop them in the comments section below. Your insights not only help you but also benefit the whole photography community.
Thanks for reading, and here’s to capturing those awe-inspiring landscapes!
That’s it for now – Keep clicking and stay caffeinated
Like this post? PIN it so you can save it for later
Other Helpful Articles:
- Filters For Landscape Photography: How To Choose What’s Best For You
- Why & How To Use A Circular Polarising Filter
- Skill and Vision in Landscape Photography: More Important Than Gear
- The Beauty Of Long Exposure Landscape Photography
- Understanding Exposure: Landscape Photography Exposure
- The Importance of Clouds in Landscape Photography
- Essential Landscape Photography Gear
- Landscape Photography Accessories Every Photographer Should Have In Their Bag
Don’t miss a post – sign up Here if you haven’t already
Note – Unless otherwise stated, all photos are mine and remain my copyright images – Sam Wilson Photography.
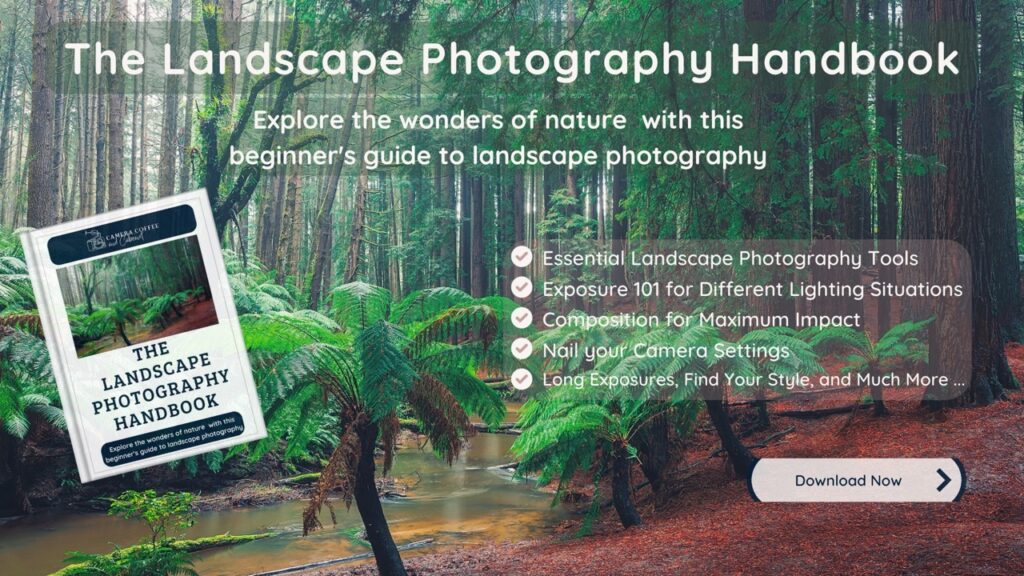
Are you a beginner landscape photographer looking to improve your skills and capture stunning photos of nature?
Our ebook, ‘The Landscape Photography Handbook – Exploring the Wonders of Nature,’ is the perfect guide for you.
With 90 pages of expert advice and practical tips, you’ll learn everything you need to know to capture breathtaking landscapes like a pro.
From essential gear and camera settings to composition techniques and planning your shoot, this comprehensive guide covers it all.
Plus, you’ll discover how to develop your own style, build your confidence as a photographer, and use editing tools to enhance your images.
Get your copy today and start exploring the wonders of nature with your camera!