Clouds In Landscape Photography: Tips For Powerful Photos
This article is all about the importance of clouds in landscape photography.
When I first started landscape photography, I never really considered the importance of clouds.
I just knew that I wanted to capture those beautiful and colourful photos with lots of colour in the sky, and it didn’t take me long to learn how important clouds were in creating these stunning images..
Most landscape photographers will agree that clouds are their best friend. We are possibly the only people that are not hoping for a completely clear sky when they head out.
We don’t necessarily want it to rain, but we do want some clouds in our skies.
But it’s not just any clouds that will transform your clouds. From those beautiful wispy clouds to intense dramatic storm clouds, there are many ways that clouds have an impact.
There are also many possibilities on how to capture those images, from your camera settings, to composition, reflections and long exposures can all have an impact.
Before we dive in, I wanted to share a special freebie for you if you’re also new to photography.
It’s my FREE Exposure Quick Start Guide designed to get you started in your journey by learning the elements of exposure and start taking better photos – Fast!

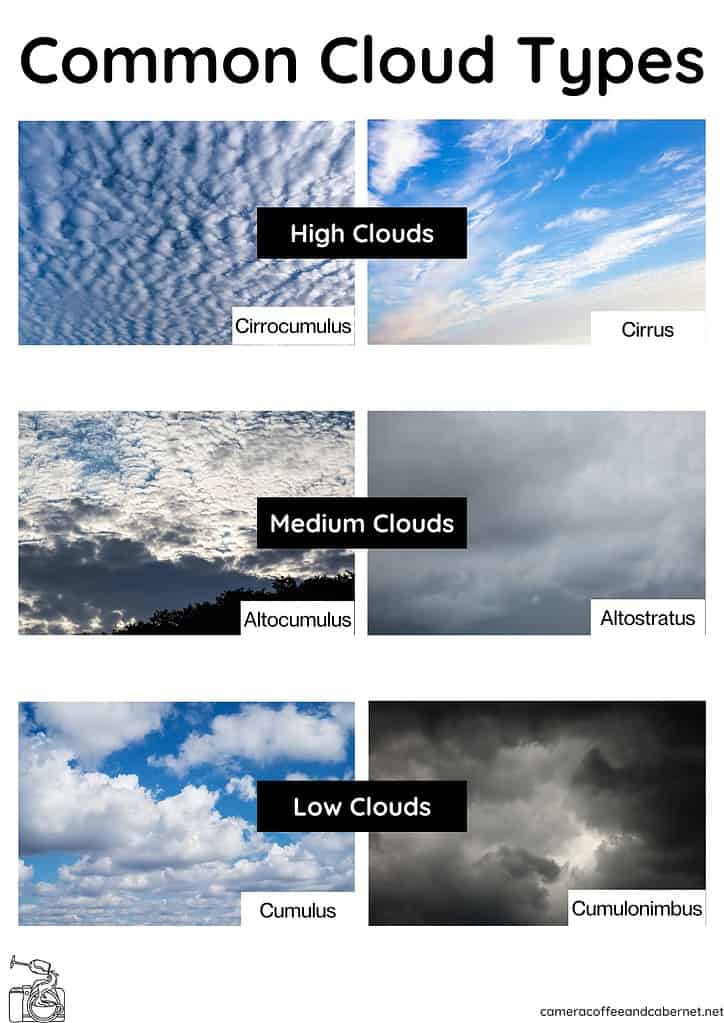
The Types Of Clouds
There are many different types of clouds, and each will have a different impact on your images.
We will cover here the most common forms of clouds that can have a positive impact on your images, so you know what to look for when planning your landscape shoots.
Here’s a few key clouds to particularly note to enhance your images:
High Clouds (above 6km)
High clouds (above 6km) like Cirrus clouds are those lovely delicate wispy clouds provide a beautiful backdrop for your golden hour photography and create stunning colours and interest in your photos.
Then there are cirrocumulus or altocumulus clouds, that are often referred to as a ‘mackerel sky’.
Their appearance can seem similar to fish scales, and they offer a rippling pattern to the sky in your images.
The last high clouds of note are Cirrostratus clouds; these cover the whole sky and can cause a halo-like appearance around the sun or moon.
Medium Height Clouds (2.5 – 6km)
The two types of medium clouds to note for your photography are Altostratus and Altocumulus.
Altostratus usually cover the whole sky and don’t have a lot of texture, but are a good indicator of rain or snow.
Altocumulus have several patchy layers with ripples that can create interesting textures.
Low Level Clouds (below 2.5km)
While you don’t want boring ‘blanket-like’ low clouds like stratus that just looks like fog without any texture, there are a couple of low level clouds that are fabulous for your landscapes.
Cumulus clouds are the nice puffy cotton ball clouds that help add vibrancy to your photos, while cumulonimbus are your ominous storm clouds that can add incredible drama and atmosphere.
You certainly don’t need to be a cloud expert, but it is handy to have a basic understanding of the different types and how they impact your photography.
Get Your Timing Right
If you want to capture skies that add drama to your photos, choosing the right time to shoot is crucial.
Partly to mostly cloudy skies often lead to the most colourful sunsets.
While plenty of clouds can enhance the colours of the sunrise or sunset, too many can block out the light completely.
Since cloud patterns are unpredictable, it’s good to be prepared when there’s a mix of clouds. Just a small opening at the horizon, right where the sun rises or sets, can light up a mostly cloudy sky.
Clouds can also reflect light onto the landscape below, adding vibrancy to your photo.

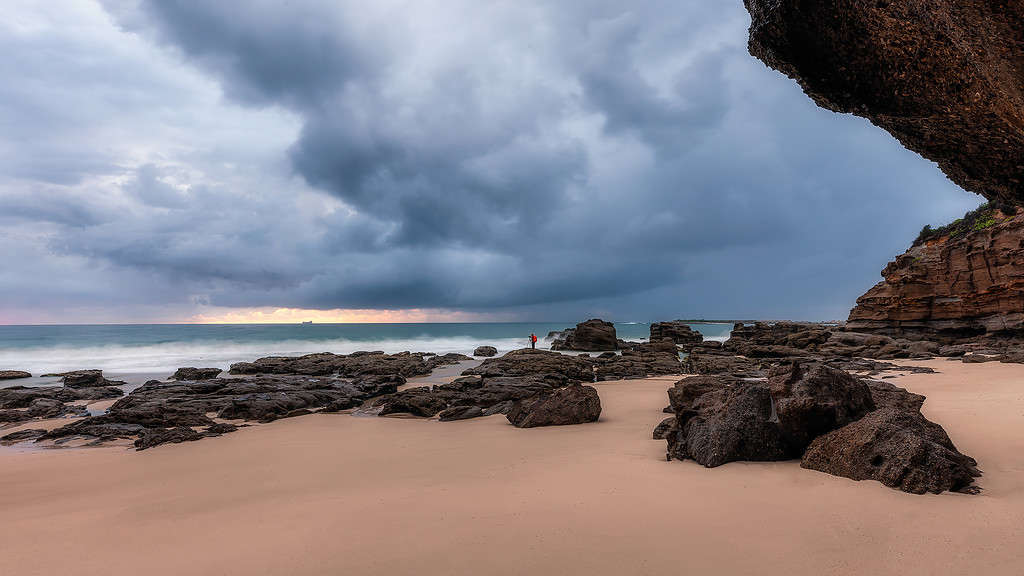
Storm clouds, especially when they are forming or clearing, create some of the most dramatic scenes. These large clouds add depth and transform even the simplest light into something special, like during a storm over desert sandstone.
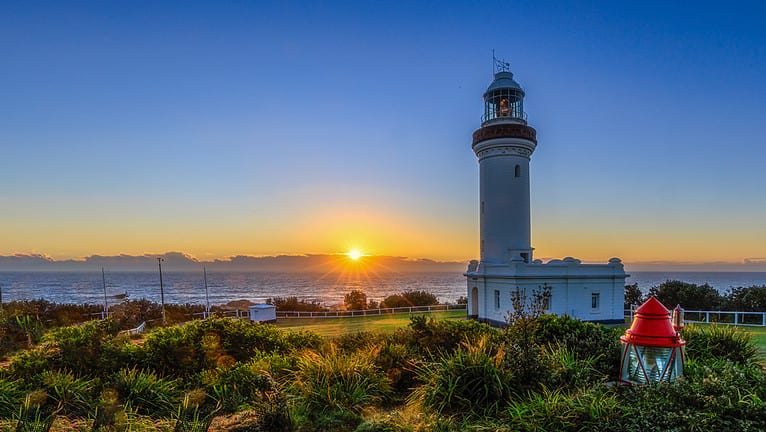
It’s common knowledge that the most colourful skies appear at sunrise and sunset. On clear days, the horizon glows orange at these times. A few clouds can transform the sky dramatically as the sun lights up the clouds from below.
What kind of skies should you look out for?
Stormy skies are impressive, but don’t overlook partly cloudy mornings and evenings.
These skies can turn into a stunning array of colours, giving the landscape a magical feel.
Even after the sun has set, during the blue hour, the sky can continue to change, offering more opportunities for great photos.
However, grey, overcast skies usually result in dull photos, and clear blue skies don’t offer much variety. It’s best to avoid these when you’re looking for impactful shots.
To make sure you’re out at the right time, use a reliable weather app to check the forecast a few days and again a few hours before you plan to shoot.
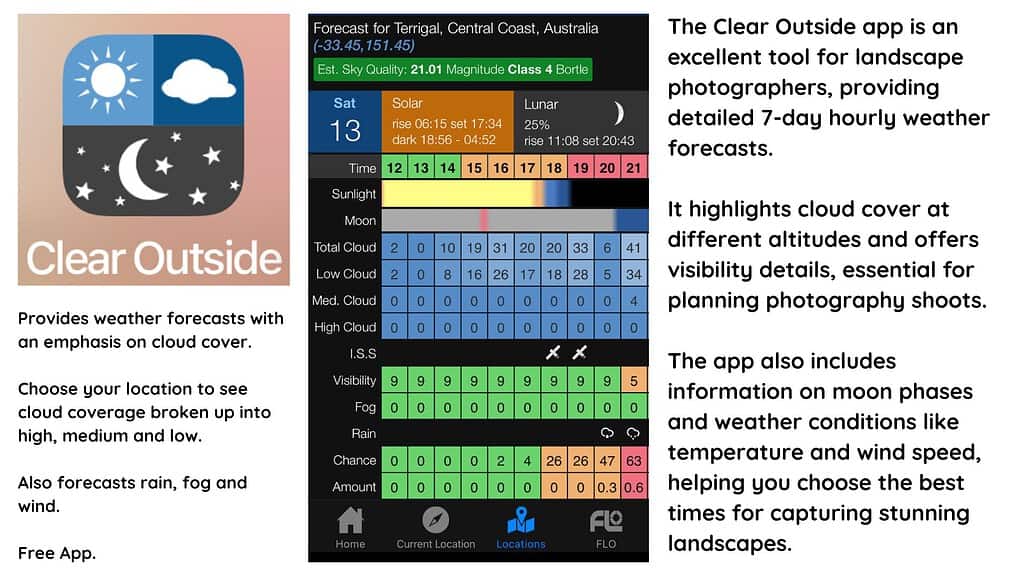
But remember, weather forecasts can be wrong. Always keep an eye on the sky – you might find unexpected opportunities for fantastic photos.
Shoot In RAW
To achieve the most striking landscape photos, particularly those with dramatic skies, choosing the right file format is essential.
Many beginners often opt for JPEG without realising its limitations due to compression.
I strongly recommend you shoot your landscapes in RAW. This format captures every shade and detail of colour your camera can record.
By keeping all the original data from when you take the shot, RAW files give you extensive flexibility in post processing. You can significantly tweak colours and adjust exposure, even retrieving details in areas that first appeared too dark or too light.
This freedom lets you perfect your images to match the vision you had when you clicked the shutter.
Think About Your White Balance
White balance is a camera setting that adjusts colours to make them appear more natural, particularly in different lighting conditions.
It ensures that white objects look white, which helps maintain colour accuracy across your photos.
Typically, photographers are advised to adjust their white balance based on the lighting conditions to avoid colour casts – unnatural colour tints in photos.
For example, sunlight and shade each cast different hues on a scene, and adjusting the white balance compensates for these differences.
However, there are times when deviating from these standard rules can enhance your photos, especially when capturing the sky at sunrise or sunset.
You can experiment with different white balance settings to alter the mood and colour tone of your skies. For instance, settings like Auto, Cloudy, or Shade can turn a sunset orange with a light blue sky.
I usually shoot with the Auto white balance setting because it’s one less thing to manage while I’m in the field.
This setting automatically adjusts to the lighting conditions, which is often sufficient for most scenes.
However, if you’re looking to creatively alter the atmosphere of your shots, playing with other white balance settings can be fun.

What Is the Kelvin Scale? The Ultimate Guide to Every Colour Temperature
Remember, if the colours in your photos don’t turn out as expected, shooting in RAW allows for easy correction during post-processing.
Composition Tips
For great landscape photos, it’s not just about having a beautiful sky. It’s also important that the sky works well with the landscape below.
You want the sky and the land to connect in your photo, making it easy for anyone looking at it to enjoy both parts together.
When you set up your shot, use the same simple composition techniques for the sky that you do for the landscape.
These techniques include using lines that lead the eye, creating gentle curves, leaving some empty space, and placing things in your photo so that they feel balanced.
Clouds can move quickly, so sometimes you have to be quick to capture them before they change.
Other times, you might find yourself waiting for the perfect moment when the clouds are just right.
This can feel like a game of hurry-up and wait, but it’s all part of taking stunning landscape photos where the sky and the land seem to fit together perfectly.

Using Filters to Enhance Clouds in Your Landscape Photos
Clouds can dramatically transform a landscape photo, adding depth and emotion to your scenes.
But capturing clouds effectively often involves dealing with the bright sky alongside a darker land.
This is where using the right filters comes in handy. I want to share with you how simple it can be to use certain filters to enhance the clouds in your photos, ensuring they contribute beautifully to your landscapes.
1. Neutral Density (ND) Filters:
Neutral Density Filters are like reducing the brightness without changing the colours.
They are great for days when the clouds are moving quickly across the sky, as you can use a longer exposure to capture the movement, adding a bit of drama to the skies in your landscape shots.
2. Polarising Filters:
A polarising filter is my go-to for making the clouds really stand out. It helps by reducing the glare from the sun and deepening the blue of the sky, which makes the white of the clouds pop.
3. Graduated Neutral Density (GND) Filters:
I often use GND filters when the sky is much brighter than the landscape. These filters are dark on the top and gradually become clear towards the bottom.
This helps even out the exposure between the sky and the land, making sure the clouds don’t just blend into the background. It’s perfect for times like sunrise or sunset when the sky can overshadow everything else.
Using these filters can help you manage tricky lighting situations and bring out the best in the clouds, enhancing the overall impact of your landscape photography.

Adjusting Exposure Times to Capture the Best Clouds
Clouds can transform a landscape photograph, adding depth and atmosphere.
To capture them effectively, adjusting your exposure settings is key, depending on whether you’re after sharp details or a more ethereal look.
Short Exposures:
For those times when clouds are moving quickly across the sky and you want to capture their crisp, detailed texture, short exposures are ideal. This freezes their movement, making each cloud stand out distinctly against the sky.
Long Exposures:
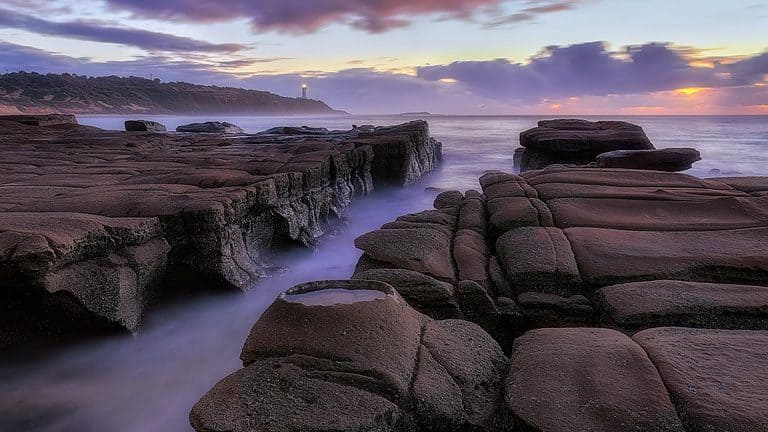
If you prefer a softer, dreamier look where clouds appear as smooth streaks across the sky, go for long exposures .
This technique is perfect for adding drama to your landscapes. On bright days, using an ND filter will help manage the extra light and allow you to extend the exposure time without risking overexposure.
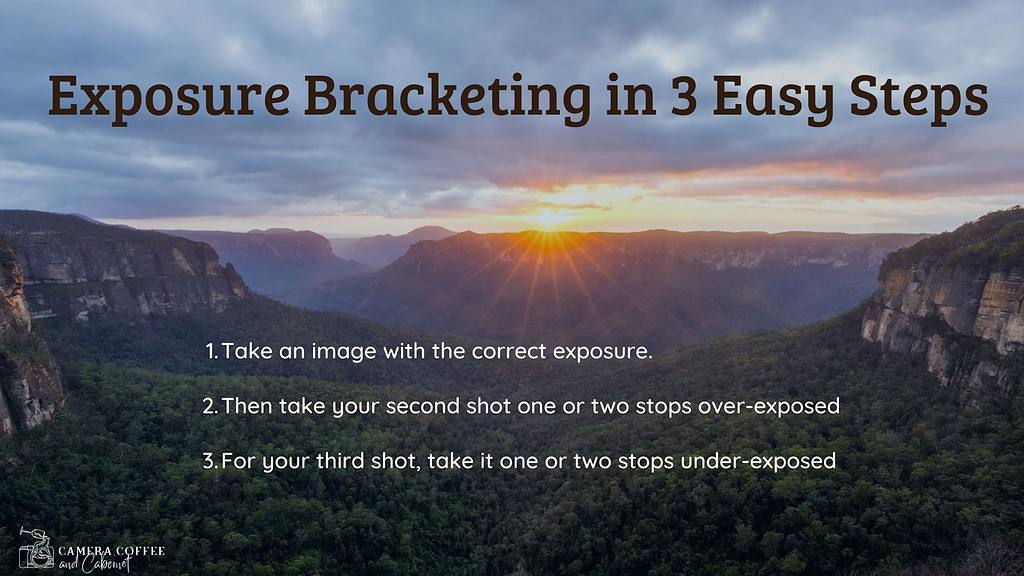
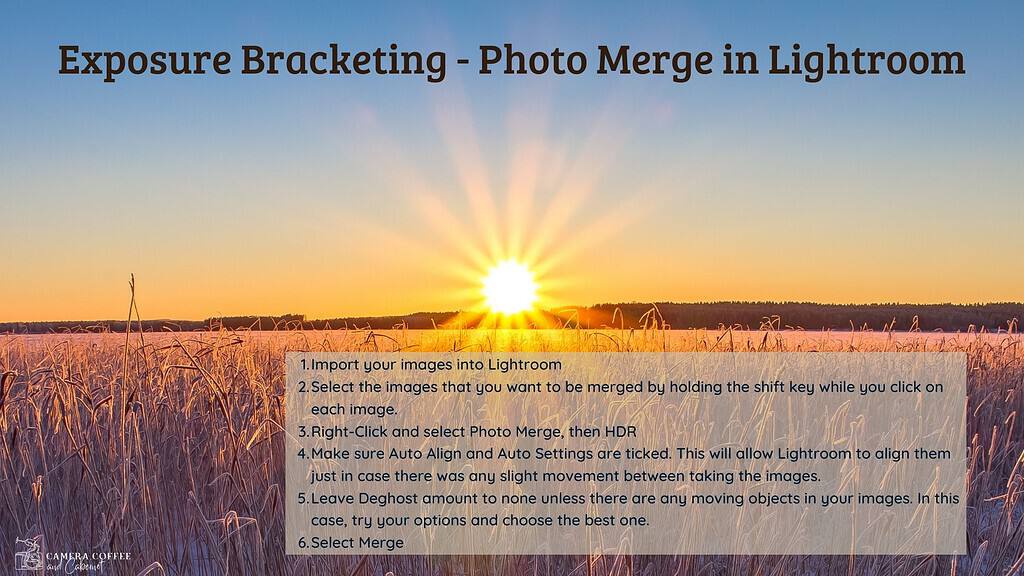
Exposure Bracketing:
When capturing clouds, consider using exposure bracketing.
By taking multiple shots at different exposure levels, such as -1, 0, +1, you ensure that you capture all the nuances of light and shadow in the clouds.
This technique is invaluable in high-contrast situations, helping you to achieve a balanced final image with well-defined clouds.
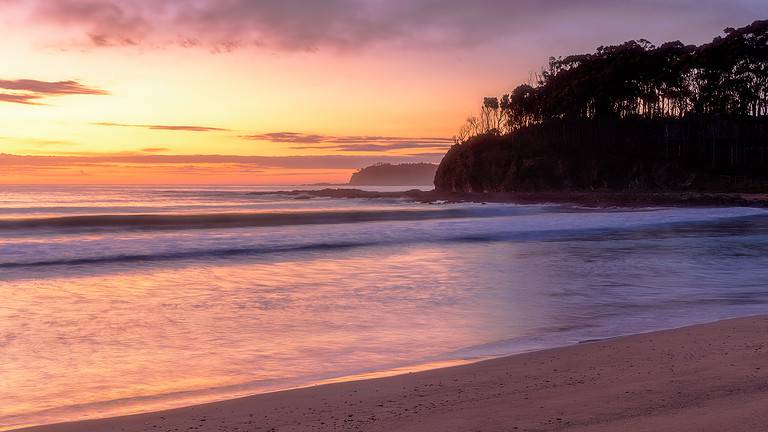
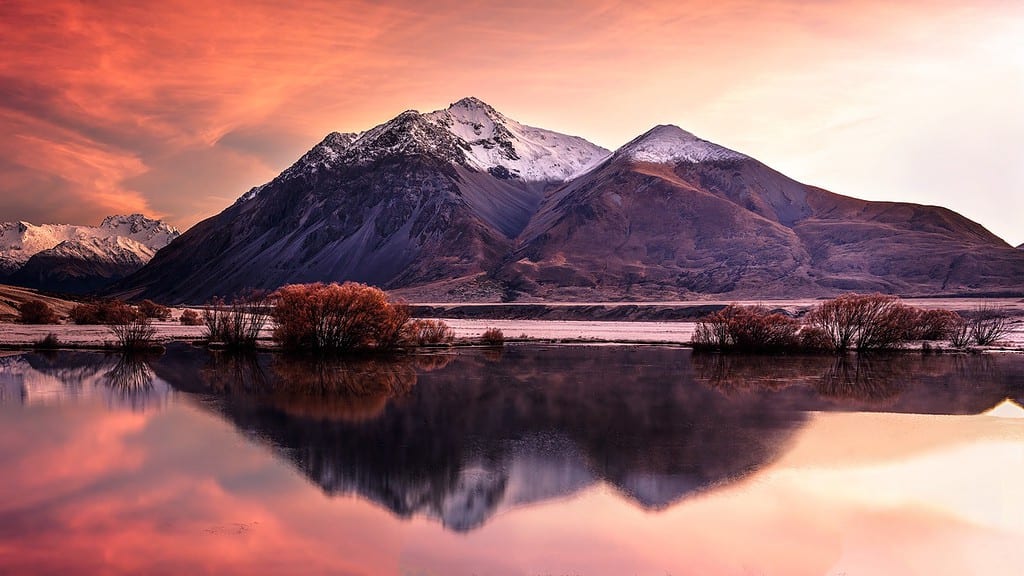
While the main focus is on the clouds, don’t overlook the power of reflections to add depth to your landscape photos.
A simple reflection can double the impact of a dramatic sky. Look for calm bodies of water like lakes or even puddles after rain, which can mirror the beauty of the clouds above.
By positioning these reflective surfaces in your frame, you can create a symmetrical composition that emphasises the grandeur of the clouds.
This quick adjustment to your shooting angle can transform a good photo into a stunning one, capturing both the sky and its reflection in perfect harmony.
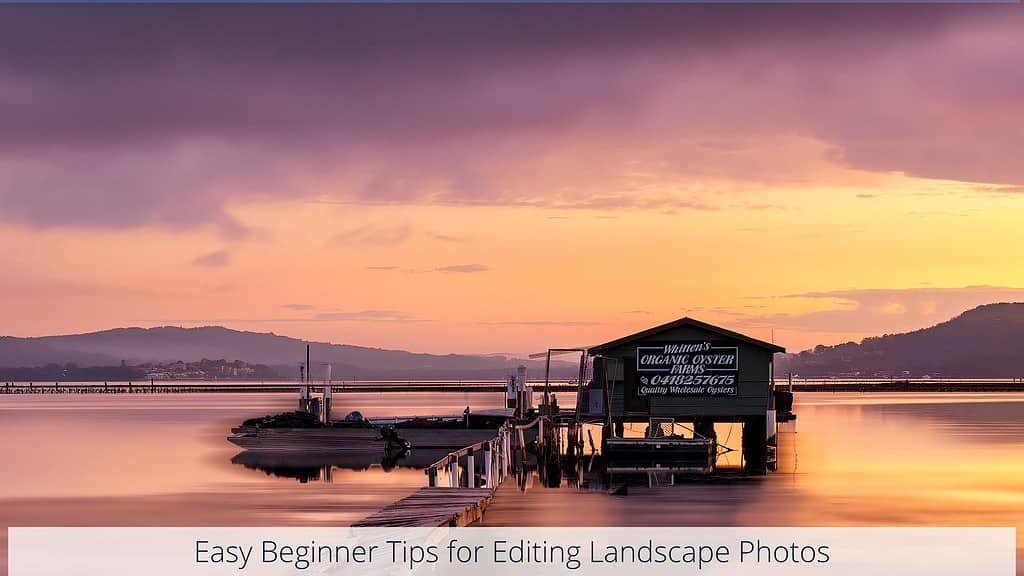
Enhancing Clouds in Post-Processing
Once you’ve captured your landscape photos with beautiful clouds, the next step is to enhance them further through post processing.
Here are some simple steps to get you started:
Adjust Exposure: Begin by adjusting the overall exposure of your photo to ensure that both the sky and the landscape are properly exposed. You can use basic exposure sliders like brightness, contrast, and shadows/highlights to fine-tune the overall exposure.
Enhance Contrast: Increasing the contrast can help make the clouds stand out more against the sky. Be careful not to overdo it, as excessive contrast can lead to unnatural-looking results.
Boost Saturation: Slightly increasing the saturation of the blues and whites in the sky can help make the clouds appear more vibrant and dynamic. Again, moderation is key to avoid an artificial look.
Sharpen Details: Use the sharpening tool to enhance the details in the clouds, making them appear sharper and more defined. Be cautious not to apply too much sharpening, as it can introduce unwanted noise.
Crop and Straighten: Finally, consider cropping and straightening the composition to remove any unnecessary elements and ensure that the focus remains on the clouds and the landscape.
Remember, post-processing is a creative process, so feel free to experiment with different adjustments until you achieve the desired look.
Conclusion
This article was all about the importance of clouds in landscape photography.
Remember those days of childhood when we gazed at clouds, imagining shapes and stories?
Now, with our photography, we can include those same clouds to craft captivating images.
Clouds are more than just background scenery; they’re the brushstrokes that paint emotion and drama across our landscapes.
From understanding cloud types to mastering timing, shooting in RAW, and considering white balance, every element plays a crucial role in capturing the perfect shot.
Applying composition tips, utilising filters, experimenting with long exposures, and post-processing techniques elevate our images to new heights.
So, as you continue your photographic journey, let the clouds inspire your creativity and lead you to new horizons.
That’s it for now – Keep clicking and sipping 📷 ☕ 🍷
Like this post? PIN it so you can save it for later
Other Helpful Articles:
- Landscape Photography Guide
- 15 Helpful Landscape Photography Guides For Beginners
- Camera Settings For Landscape Photography
- Understanding The Exposure Triangle
- Golden Hour Landscape Photography
- Landscape Photography In The Rain
Are you a beginner landscape photographer looking to improve your skills and capture stunning photos of nature?
If so, “The Landscape Photography Handbook – Exploring the Wonders of Nature” is the perfect guide for you.
In this 90-page ebook, you’ll learn everything you need to know to get off auto mode and start using manual settings to capture stunning photos of nature.