Sunrise Photography: Best Camera Settings and Tips for Beautiful Photos
There’s something special about sunrise photography that just can’t be beaten. Maybe it’s the tranquil stillness, the beauty of the colours, or the promise of a brand new day. Whatever the reason, it’s no wonder so many of us love to capture those precious moments on camera.
But if you’ve struggled to get the perfect shot, don’t worry, you’re not alone. Capturing a beautiful sunrise can be a bit tricky, but with the right camera settings and some simple tips, you can take breathtaking photos that you will be proud of.
This article is all about sunrise photography. If you’re looking to take stunning sunrise images, this guide has you covered. Discover the best camera settings, tips on exposure, filters, composition and more to capture beautiful sunrise images.
So, why shoot at sunrise anyway?
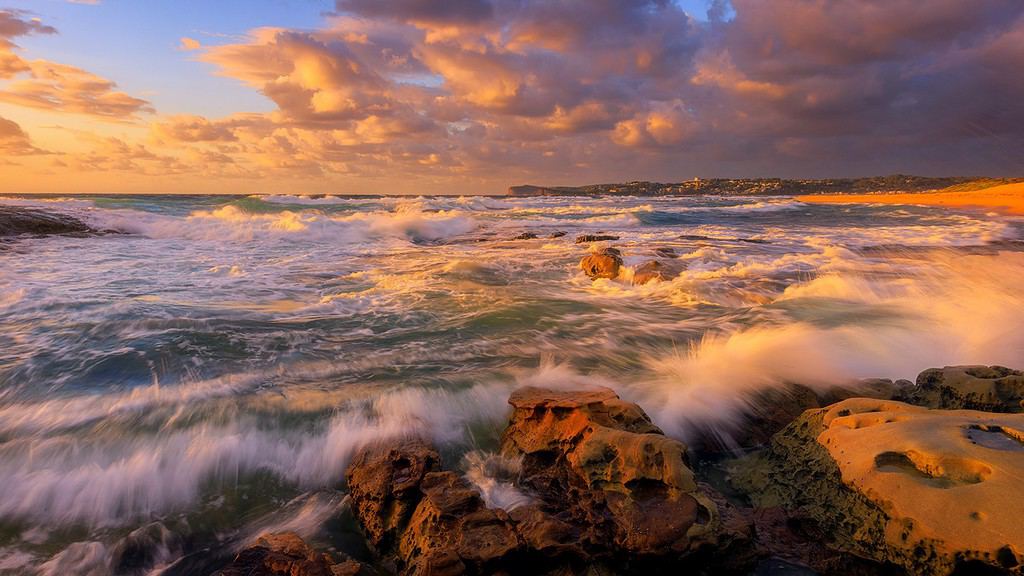
To put it simply, sunrise and sunset offer more dramatic lighting than any other time of day, creating rich and vibrant colours on your subjects due to the sunlight’s refraction.
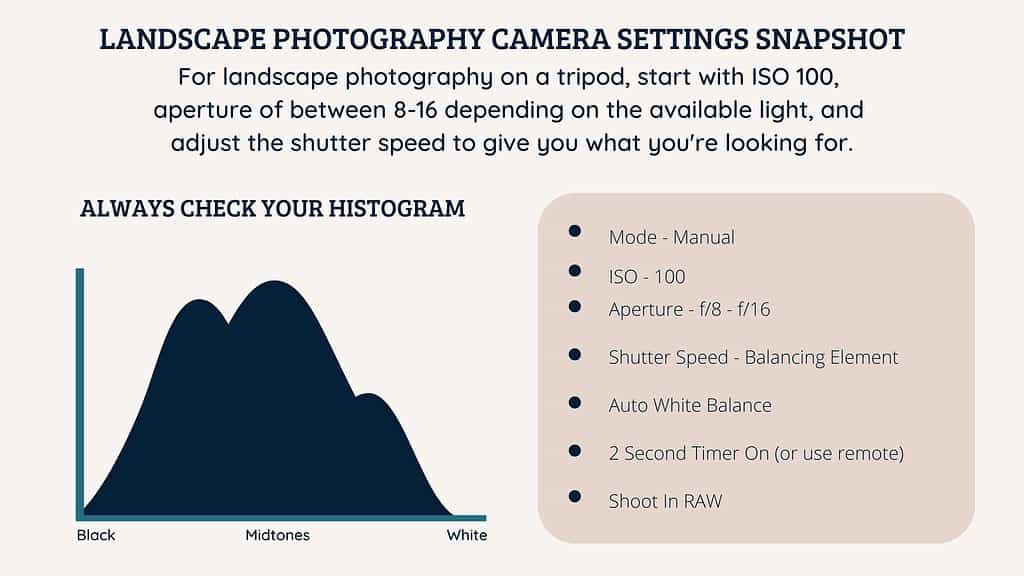
For landscape photography on a tripod, start with ISO 100, aperture of between F8-F16 depending on the available light, and adjust the shutter speed to give you what you’re looking for.
Here’s a snapshot for those of you who just want to jump right in:
- Manual Mode
- ISO 100
- Aperture F8 – F16
- Shutter Speed – adjust to get correct exposure
- Auto White Balance
- 2-second timer on (or use remote)
- Shoot in RAW

Preparing for Sunrise Photography
Proper planning really is key to capturing the perfect sunrise image.
Here’s some of the things you need to consider before you head out:
– The gear to pack
– How to get there
– Parking details
– The walking distance from your car
If it’s the first time you’re heading to a location, make sure you research as much as you can beforehand, or even better, do a scouting mission in daylight (much easier than stumbling around in the dark).
The night before your shoot, make sure to pack all your gear and check it twice – don’t underestimate this critical phase!
Charge extra camera batteries, pack filters and your tripod, and don’t forget to note the sunrise time and direction.
Strengthen your shoot by being prepared and set that alarm!
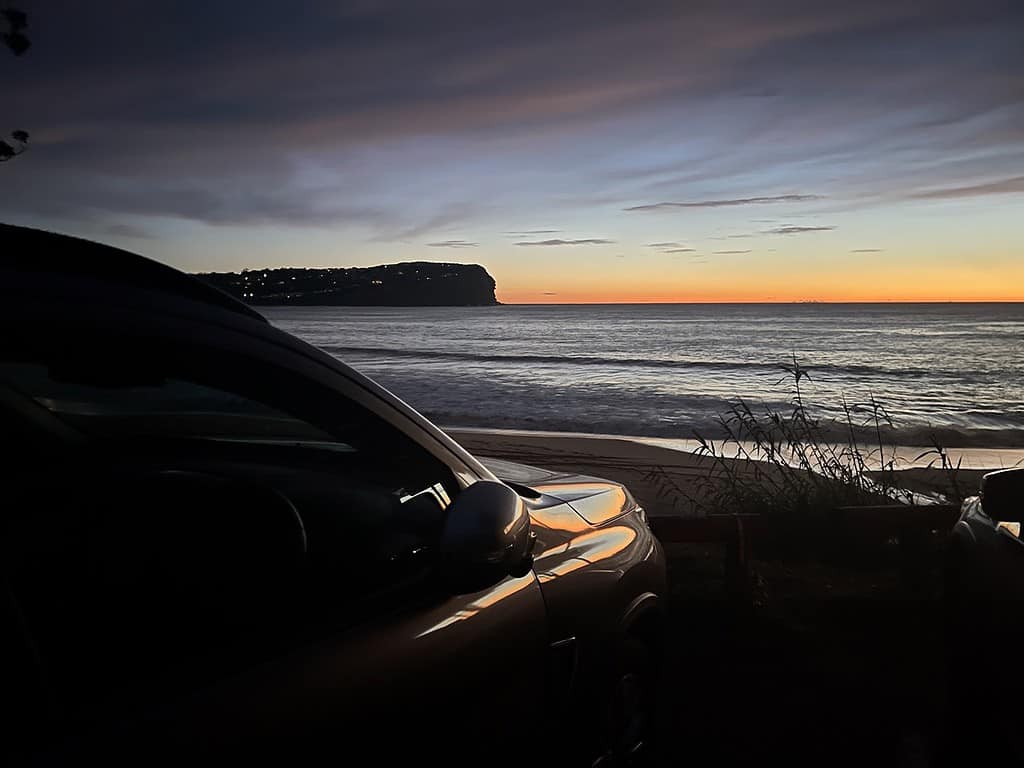
Sunrise Photography: Arrive Early
Obviously sunrise is already early, but honestly that blue hour before the sun pops up can truly be the best photos of your morning.
First light is usually around 30 minutes before sunrise and I like to be in place around 30 minutes before that – ridiculous but can be so worth it!
Getting to the location early is one of the most critical rules of landscape photography. It really is key to capture those breathtaking sunrise photos.
There really is nothing worse than driving to your location and the sky is already on fire, and you know you’ve missed the best light of the day.
I’ve seen so many photographers getting to the location when the sun has already popped up – you don’t want to be that photographer!
Camera Settings to Improve Your Sunrise Photos
So what are the best settings for sunrise photography?
The best camera settings for landscape photography really do start with shooting in manual mode as it gives you the most control. Set your ISO to the lowest possible, Aperture to F8-F11, and adjust your shutter speed to achieve the correct exposure. Your settings will change depending on the scene, so let’s look in more detail.
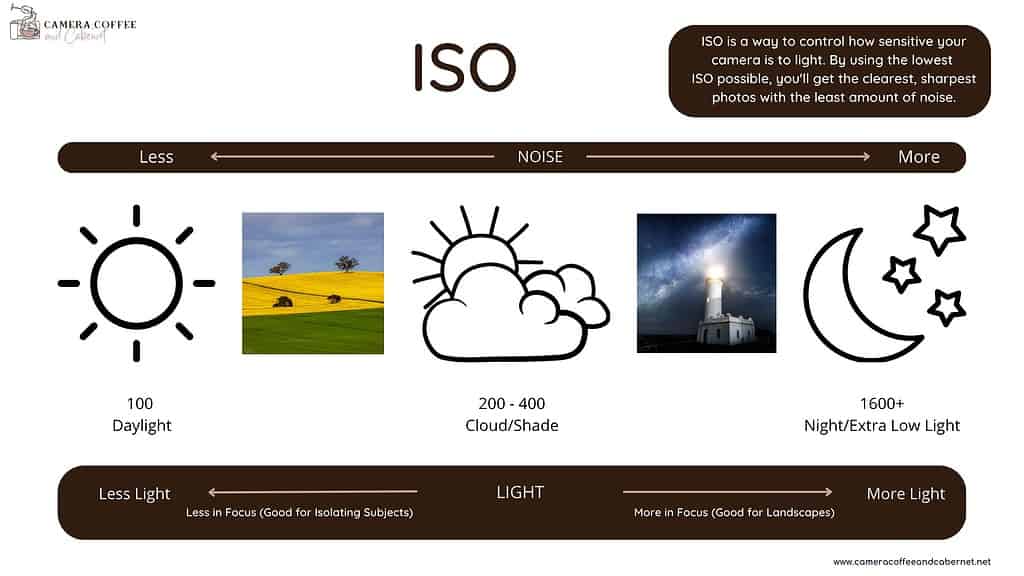
ISO
Keep your ISO as low as possible to avoid graininess.
The scene will be dark when you arrive so you may need to increase your ISO to help with seeing your composition, but don’t forget to change it back to 100 as soon as you can and use a longer shutter speed.
As you should be using a tripod for sunrise photography, camera shake won’t be an issue.
Remember to adjust your shutter speed as needed to ensure correct exposure.
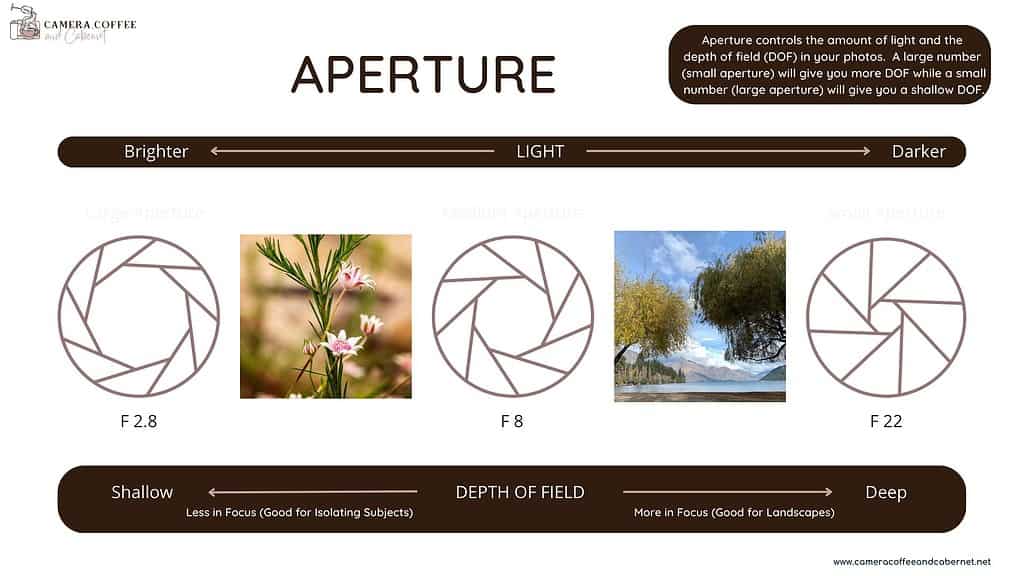
Aperture
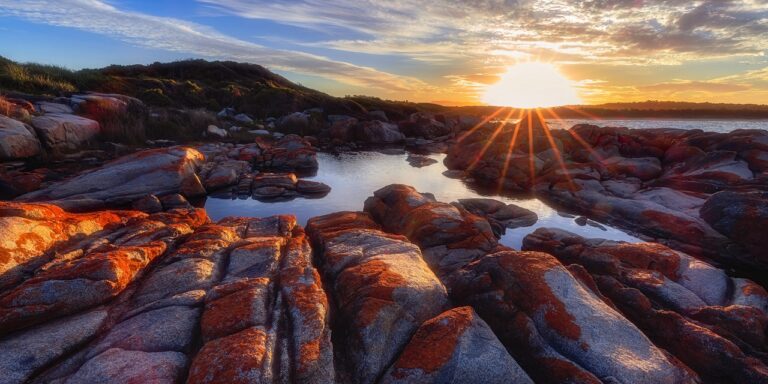
Set your aperture to a high number (between f/18 and f/16) to get the largest possible depth of field and to keep as much of the scene in focus as possible.
A higher f-stop (between f/16 and f/22) can also create a stunning starburst effect in your sunrise photos. This can look amazing as the sun just peeps over the horizon if you’re shooting over the ocean, or just popping up over a mountain.
If you’re interested in learning more about how to create beautiful starbursts in your sunset photos, check out my article on the topic: Creating Beautiful Starbursts in Your Photos.
Shutter Speed
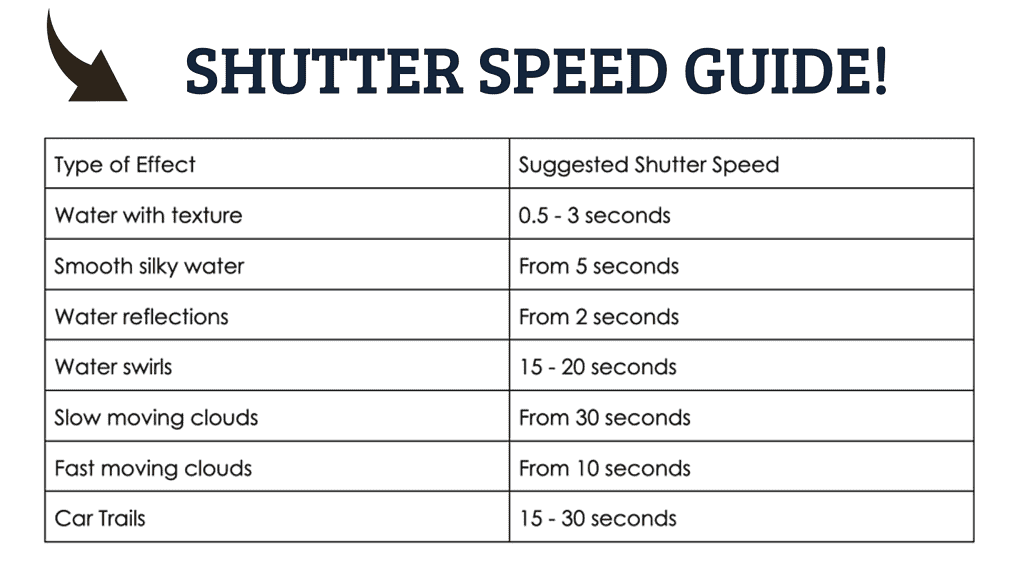
As the scene will be quite dark when you are starting out, you will need to set a long shutter speed so your early photos won’t be too underexposed.
You may need to use Bulb mode depending on how long you can set the shutter speed with your particular camera. My camera allows for 30 seconds before needing bulb mode.
This article by PetaPixel tells you everything you need to know about bulb mode: How to Use Bulb Mode on a Camera for Long Exposure Photos.

The Essential Gear For Your Sunrise Photography
While it’s easy to get caught up in buying fancy gear to get better photos, the reality is that’s really not that necessary.
As long as you have a camera that can shoot in manual mode where you have control of the settings, you can get great sunrise photos.
If you’re just starting out in your landscape photography journey, then I recommend the following as essentials –
- Camera and lens (of course)
- Tripod – you really shouldn’t be able to buy a camera without buying a tripod (regardless of the type of photography you’re interested in)
- Torch – most landscape photography will involve either sunrise or sunset, or even astro, so one of these is essential.
- Bag – this doesn’t have to be a fancy camera bag (although these do have benefits) but you need something to carry your camera in.
- Cleaning Cloths – trust me on the plural here. They can and do so easily get wet or lost.
For a full guide on essential gear and accessories you can check these guides out, but don’t get too carried away if you’re just starting out.

Try Different Exposures for Sunrise Photos
Long Exposures
Sunrise is the perfect time to experiment with long exposure techniques.
By using a slower shutter speed, you can create a sense of motion and capture the ever-changing colours of the sky.
Again, make sure you’re using a tripod for stability and adjust the ISO settings to reduce noise.
Don’t be afraid to play with various shutter speeds to find the perfect balance between exposure and capturing a sharp photo.
Silhouettes
Incorporating silhouettes into your sunrise photos can add a dramatic and artistic effect.
To create silhouettes, position your subject between the camera and the rising sun. This will cause the subject to appear as a dark shape against the vibrant colours of the sunrise.
Be mindful of the background and ensure there are no distractions that may detract from the overall composition.
By experimenting with different subjects and silhouettes, you can create some really captivating sunrise images.
Use Exposure Bracketing to Capture the High Dynamic Range
Lide so many scenes you will come across in your landscape photography journey, the range of light at sunrise can be difficult to capture in a single shot.
Filters can help with this (more on filters below), but my favourite technique to manage this is with exposure bracketing.
This is a relatively simple technique where you take multiple shots of the same scene at different exposures to help you capture the high dynamic range (HDR) of the sunrise scene.
Basically you take three shots (without moving your camera) of the same scene: one correctly exposed, one overexposed, and one underexposed. The underexposed shot captures the details in the highlights, while the overexposed shot captures the details in the shadows. The correctly exposed shot serves as a reference point for the other shots.
Then, when you get home, you can use software like Adobe or Luminar NEO to blend these different exposures into a single HDR image. The software will magically align your images and blend your exposures to produce an image that brings out all the details – from the dark shadows to your brighter highlights.

Don’t stress it this is something new to you – it’s really much easier than it sounds. Check out this article on exposure bracketing that will walk you through the process.
Remember, exposure bracketing and HDR processing are powerful for sunrise photography, but use them wisely. Overdone HDR can look unnatural and detract from the beauty of the scene.
I always strive for a balanced and natural-looking result to showcase the true splendour of the sunrise.
White Balance: Why I Recommend Shooting In Auto
White balance is a camera setting that you use to control the temperature of your image.
Sunrises tend to be warmer as a general rule so I’ve seen people recommend shooting in ‘shade’ or cloudy to reflect this.
While they are absolutely correct in suggesting this, for me it’s something I can ‘set and forget’ and then adjust when I’m post processing my images later.
If you only want to shoot in JPEG and not edit your images at all, then yes, take a variety of images with different white balance settings so you’ve got all bases covered.
Otherwise, shoot in RAW so you’ve got control, and not your camera.
Which leads me to the next sunrise photography tip …
Why Shooting in RAW is Key for Stunning Sunrise Photos
I still remember going to my first sunrise photography shoot (having really no idea what I was doing) and being asked if I was shooting in RAW.
What?
I was told I must shoot in RAW, and so I did without any real understanding of why.
Now, don’t get me wrong. This advice was great, and here is why –
The main reason for shooting in RAW vs JPEG is the enhanced flexibility it provides during post-production. Unlike JPEGs, RAW files retain all the data captured by your camera sensor, allowing for far greater control in post-processing.
While your RAW files will definitely look a bit ‘flat’ when you upload them compared to JPEG’s, with a little bit of post-processing (it doesn’t have to be crazy), you can turn them into incredible images. So, don’t let the camera do the editing for you.
Remember, when shooting in RAW, larger file sizes are to be expected, as more information is retained. Make sure you have sufficient memory card capacity. However, don’t let this deter you, as the benefits of RAW far outweigh the potential storage drawbacks.
So shoot in RAW and take control of all of your photos, not just your sunrise images.
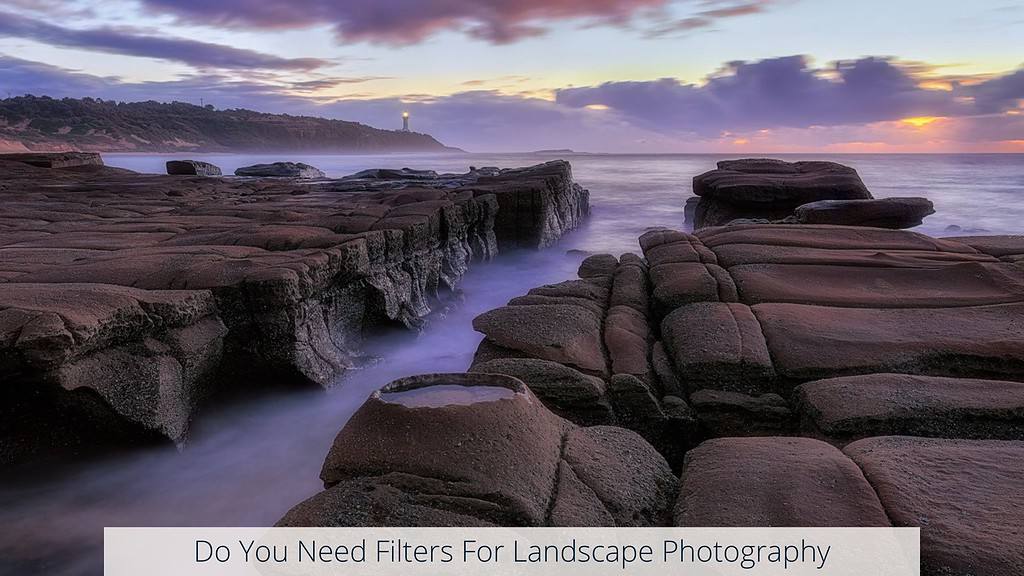
Enhance Your Sunrise Images with the Right Filters
If you want to bring out the best of what you see in your sunrise photography, I do recommend you consider incorporating filters in your landscape photography kit.
While they are not essential, they certainly can be helpful when faced with the high dynamic scenes you see in front of you.
You certainly don’t have to go overboard in buying new gear here, but I would at least recommend a Neutral Density (ND) Filter or two if you want to be regularly shooting sunrises (or sunsets) as a part of your landscape photography journey.
Another filter worth mentioning is the Graduated Neutral Density Filter (GND). I have to admit that I have a love/hate (ok, mostly hate) relationship with these, BUT they do have a legitimate place in your sunrise photography if you use them correctly.
For a full guide on Filters and whether you need them in you sunrise photography head over here –
Composition Tips to Create Stunning Sunrise Photos
Sunrise photography, just like any type of photography, really does rely on a good composition to have any impact.
So, before you start clicking away with your settings all programmed in, take the time to compose your shot carefully.
This can certainly be challenging in those pre first light and sunrise times, but that’s where your preparation, planning and scouting comes into play.
You only need to have one composition set up in the dark – once you’ve got that nailed, it should be light enough to then move around and explore more where you can go looking for your next composition.
If you need more guidance on this (and composition can really be one of the hardest things to learn) head over to this article to Improve Your Landscape Photography Composition for the full run down.
In the meantime, here’s some things to consider –
- Look for something interesting to place in your foreground
- Consider the rule of thirds – this is one of the cardinal ‘rules’ of composition, and for good reason
- Are there any leading lines to help draw the viewer’ eyes through your image?
- Are there any opportunities to frame your subject
- Look for patterns and textures everywhere – you will be surprised, the more you look, the more they will appear.
- Move – the best way to find good compositions is to move those feet. Don’t be limited by your tripod (still an essential by the way)
TIP: Use your phone to hunt for compositions. It’s much more flexible and if you’re creative can give you some great unique angles.
Final note on composition – it really can be the difference between an ‘OK’ image to a brilliant one, so don’t discount this.
If you’re looking to share your image with others, the main goal is to draw them into your image and show them what you saw when you were standing there. That is the power of composition.
Arrive Early – And Stay Late
Make sure you set that alarm – get there before first light and don’t leave until the sun is well and truly up.
It can take more time than you think to find your composition and get your camera and tripod set up. It’s much less stressful if you’re not rushing around, particularly in the dark!
Ir’s quite common that the best light happens even before first light, and wll before the actual sunrise, and you don’t want to miss it.
It’s the same staying around for a while after the sunrise – don’t be in too much of a rush for that coffee.
Those few minutes after sunrise can be the perfect opportunity to capture beautiful sunstars in your image.
The colours can also become that bit richer and clouds can com in casting beautiful rays.
The light changes constantly so keep shooting to make sure you don’t miss possibly your best shot of the morning.
Remember, every minute can be an opportunity for a different shot.
And most importantly, don’t forget to put your gear away for a couple of minutes and just enjoy being out and celebrating the beginning of a new day!
Conclusion
In summary, capturing stunning sunrise photos is a rewarding experience that requires preparation, practice, and patience. By following these tips and choosing the best camera settings, you can create beautiful images to cherish for years to come.
Remember to scout your location ahead of time, and try to arrive at least 30 minutes before first light. This will ensure you’re set up and ready to capture the magic as it unfolds.
When it comes to camera settings, start with a low ISO, such as 100 or 200, and adjust your aperture and shutter speed accordingly for the desired depth of field and motion capture.
Don’t be afraid to experiment and bracket your shots, as changing conditions often require flexibility to get the perfect exposure.
Compose your images with thought and intention, using the rule of thirds or other compositional techniques to draw the viewer’s eye through the frame. Incorporate interesting elements, such as reflections or silhouettes, to add depth and interest to your sunrise photography.
Finally, don’t overlook the importance of post-processing to bring out the colours, contrast, and details in your sunrise images. By applying some simple edits in a program like Lightroom or Luminar NEO, you can truly make your photos shine.
With plenty of practice, determination, and the right settings, you’ll be well on your way to creating breathtaking sunrise photographs that will impress your friends and family.
Now, grab your camera gear and head out to greet the morning light – it’s waiting for you!
That’s it for now – Keep clicking and stay caffeinated
Like this post? PIN it so you can save it for later

Other Posts You Might Like:
- Sunset Photography for Beginners: Tips and Best Camera Settings
- Golden Hour Landscape Photography
- Camera Settings For Landscape Photography: Complete Guide
- Sharp Landscape Photos: Everything You Need To Know
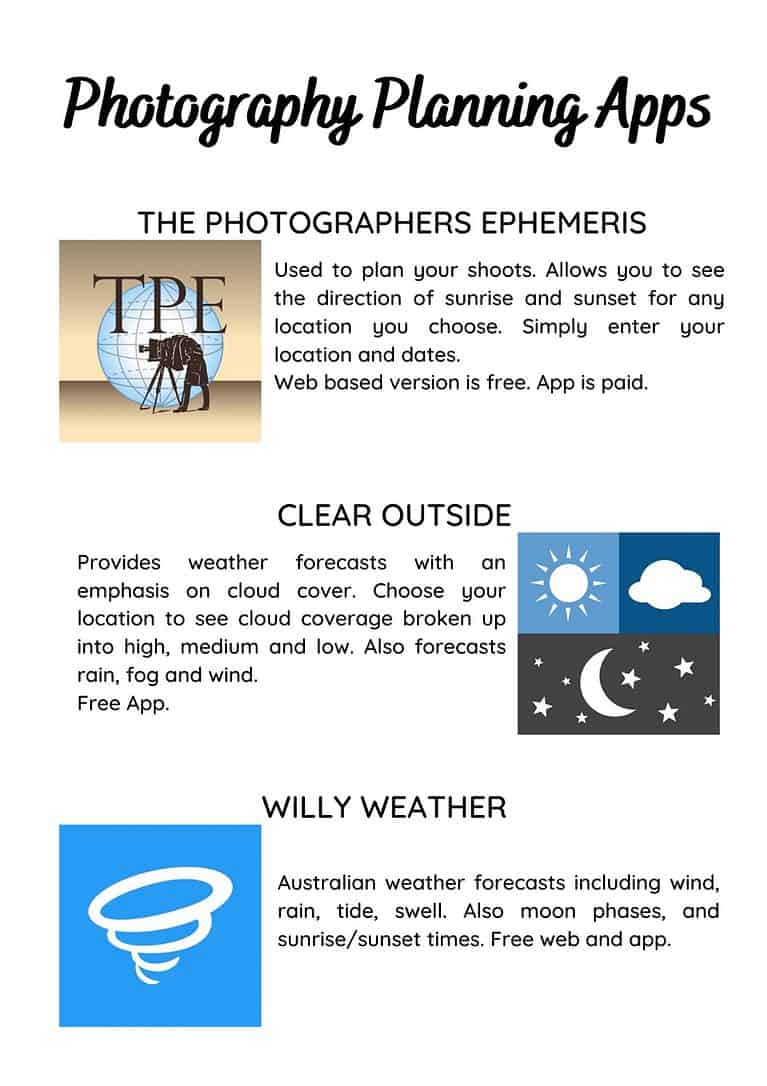
- Plan Your Next Photography Shoot
- Timing Your Landscape Photography
- The Importance Of Clouds In Landscape Photography
- Exposure Compensation: How To Use It For Better Landscape Photos
- Developing A Photography Workflow
- Developing a Successful Landscape Photography Post-Processing Workflow
- 15 Helpful Landscape Photography Guides For Beginners
Don’t miss a post – sign up Here if you haven’t already
Note – Unless otherwise stated, all photos are mine and remain my copyright images – Sam Wilson Photography.
Are you a beginner landscape photographer looking to improve your skills and capture stunning photos of nature?
Our ebook, ‘The Landscape Photography Handbook – Exploring the Wonders of Nature,’ is the perfect guide for you. With 90 pages of expert advice and practical tips, you’ll learn everything you need to know to capture breathtaking landscapes like a pro.
From essential gear and camera settings to composition techniques and planning your shoot, this comprehensive guide covers it all. Plus, you’ll discover how to develop your own style, build your confidence as a photographer, and use editing tools to enhance your images.
Get your copy today and start exploring the wonders of nature with your camera!